Team-Based Learning (TBL) is a powerful instructional methodology that transforms the focus for class time from the transmission of course content to helping students learn how to use course concepts to solve real-world problems. TBL was developed at the University of Oklahoma Business School in the late 70’s by Larry Michaelsen. We can help you implement it!
TBL has been used extensively in Applied Science in a wide range of courses – from Technology and Society courses to engineering science courses like Aerodynamics, Fracture Mechanics, and Construction Management. The Centre for Instructional Support is now one of the world leaders in the implementation of TBL in Engineering. To learn more about TBL and the implementations in Applied Science you can review:
- Lessons learned from transforming a second-year Mechanical Design course to TBL.
- Lessons learned from transforming a Construction Management course to TBL.
To learn more about TBL visit Learn TBL and Team-Based Learning
TBL – A to Z
This section will help you build your entire TBL course – step by step.
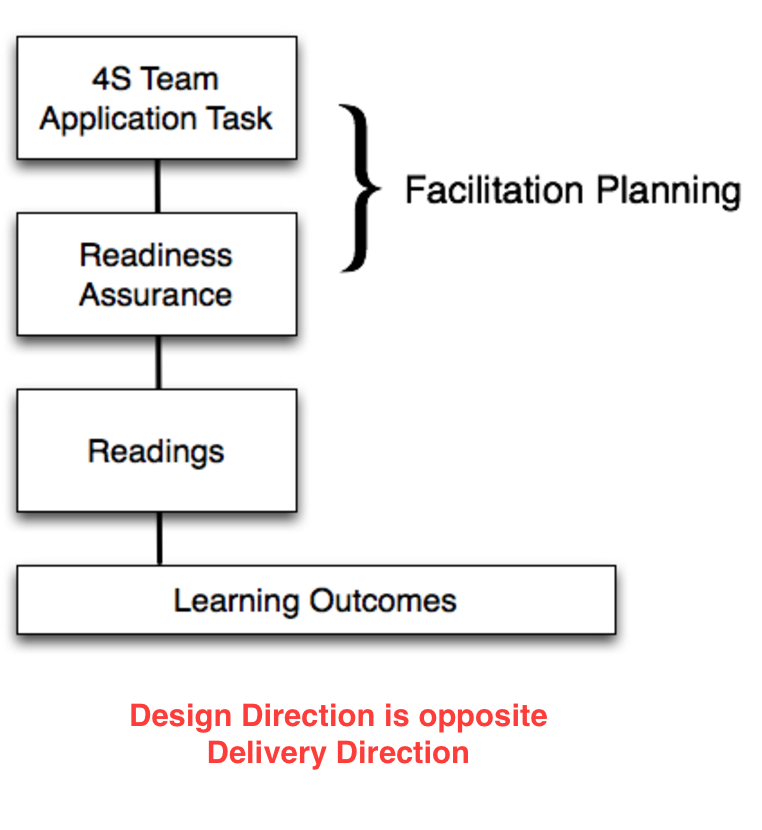
Start with Backwards Design
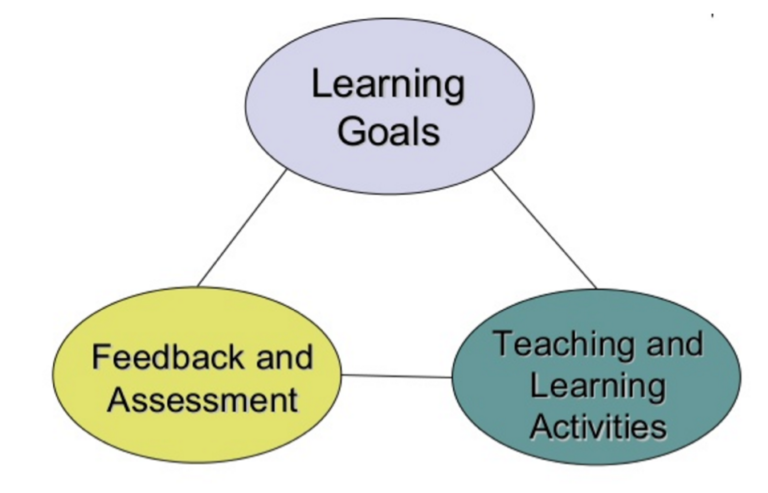
Using Backward Design is essential to developing a good TBL module. First, we need to consider “what I want the students to be able to do” by the end of the module or course, then “how will I know they can do it”, and then “what opportunities do I need to provide to help them succeed”. Dee Fink in his wonderful book, Creating Significant Learning Experiences, reminds us that we must ensure that these three aspects of our course design – Learning Goals, Feedback and Assessment, and Teaching and Learning Activities – are well integrated and mutually reinforcing. We need to develop assessable culminating student performances, in which students can show us all they have learned, and we need to develop teaching strategies that give students learning opportunities to prepare them to show us all they have learned in a culminating performance.
Initial Course Design Decisions
In this initial phase, you consider:
- Your Situational Factors
- Chunk the course into 4-7 modules
- Identify the aims of your modules
- Begin imagining 4S kinds of questions to organize the content
- Develop learning outcomes
Read before you get started:
- Wiggins and McTighe’s Why Backwards Design Is Best
- Roadmap to Creating a TBL module
Chunking your Course into Modules
To start with, first you need to chunk your course into 4-7 chunks. Each piece is usually about 2-3 weeks or 6-10 hours of class time. If you rely on how textbooks are typically organized you might have some trouble imagining only 4-7 chunks. Often textbooks are series of topics that almost implicitly want you to lecture 1 a week…we can fall into this trap because we want to be sure that all the content is covered. But TBL is different. To design a TBL course I would suggest looking at the course topics and trying to come up with alternative organizational schemes or metaphors. Maybe you can build the course around some interesting essential questions.
For example, in a Materials Engineering course, if I were to follow most textbooks…we would introduce one atom, then two atoms, then molecules and crystals, and finally, different materials and equations to calculate their properties….I’m already bored….how about we build the course differently around just two questions…why do things fail? And how do we pick the “right” material for the job? When we reorganize the course around some interesting, concrete questions, ideas for learning activities start to almost automatically come to mind.
Mapping out the Pieces
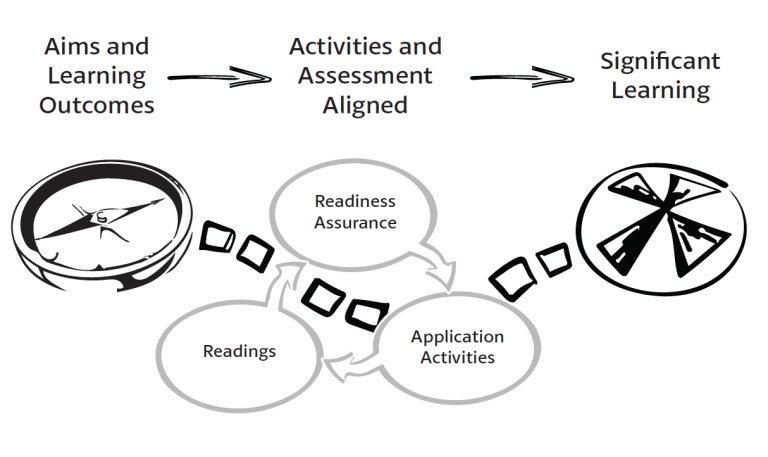
The typical 2-week TBL module starts with students completing assigned pre-readings or other preparation materials, and then at the first class meeting, they complete the Readiness Assurance Process (multiple choice test). By the end of the Readiness Assurance Process, we have some “assurance” that your students have the required minimum foundational knowledge to begin problem-solving.
The rest of the module focuses on having students use the course concepts to solve problems structured using TBL’s 4S framework. During the problem-solving process, the instructors will sometimes provide very short mini-lectures/expert clarifications when teams are having difficulty progressing.
The module ends with a short instructor-led review of all that has been learned. TBL modules always have the same progression of activities – student pre-class preparation, Readiness Assurance Process, and 4S team tasks.
Imagining Culminating Student Performance
The ultimate goal of any TBL course is to help students learn how to apply course concepts to solve interesting problems. TBL uses the very specific 4S framework to structure the problems to ensure that students do deep analysis, make difficult judgments and decisions, and build justifications and arguments that can withstand the scrutiny of other teams during the discussion following the public simultaneous report.
Great 4S tasks focus on the concrete application of abstract understandings from the readings. You are looking for those kinds of analyses and decisions that experts in your field are routinely asked to make.

During a 4S Application task, students get to concretely apply what they have abstractly learned from the readings. Because of the abstract nature of understanding, it is not “teachable” in the conventional sense. An understanding can be gained only through guided inference whereby the learner is helped to make, recognize, or verify a conclusion. (Wiggins and McTighe, 2013). You want students to connect abstract concepts from the readings with concrete experience during the 4S team Application tasks. Making connections during 4S team tasks is important to consolidate student learning. Helping students see gaps in their knowledge motivates the students to look up what they don’t know and then immediately putting that knowledge into action tests and deepens their understanding. You need to present a scenario that creates the context in which what students “know” abstractly (via their readings) is put to the test when they try to “use” it in concrete, specific cases. Your job is to find or, if necessary, fabricate these scenarios.
Getting Unstuck Activity
Brainstorming what I want students to be able to do” and those concrete disciplinary actions and relating it to the “content I feel compelled to cover” can be difficult and get you stuck – how do you get unstuck?
Take a ledger size page and divide it into two quadrants. Down the right side brainstorm ideas about what you would like your students to be able to do/solve. Down the left side, list all the content you feel compelled to cover in your course. What you are hoping to find are compelling problems to solve, that lead back to the content you hope to cover – this is an iterative process of focusing on the problems, considering what content is really essential or what content might need to be added to allow the students to successfully solve the problems.
Hopefully, significant, interesting, discipline-specific concrete actions emerge that will become the focus for the development of your application activities.

Writing Aims and Learning Outcomes
First, you need to develop your Instructional Aims. Aims are your general instructional intentions for the module. Aims are always written from the point of view of the teacher, the things you hope to achieve as a teacher.
Next, you develop Learning Outcomes. Learning Outcomes focus directly on the students and get more detailed on exactly what the students will be able to do by module end. Learning Outcomes often contain references to the knowledge, skills, and judgement abilities you want your students to develop. These Learning Outcome statements are often the precursors to ideas for 4S Application tasks. When we start thinking about the 4S Application tasks, we want to try to write Learning Outcomes that focus on more concrete actions rather than abstract understanding. We are looking for concrete actions just like a discipline expert takes. Good Learning Outcomes express how experts in your field or discipline would use the course content to solve disciplinary problems. The more concrete you can make the learning outcomes the easier it will be to develop 4S Application tasks from them.
Note below how concrete, active Learning Outcomes use verbs that are already the seeds for 4S Application task development!
Sample Learning Outcomes for a statistics course: by the end of this course students will be able to use their knowledge of statistical principles to:
- Complete a statistical analysis
- Select an appropriate sampling plan
- Develop a survey instrument and plan to gather information from a specific population
Sample Learning Outcomes for a genetics counselling course: by the end of this course students will be able to use their knowledge of genomics to:
- Interpret genome sequencing data
- Identify genetic markers with the greatest risk of disease/abnormality
- Develop a counselling plan to work with specific family issues
Sample Learning Outcomes for a business course: by the end of this course students will be able to use their knowledge of marketing principles to…
- Conduct a market analyses
- Evaluate a marketing plan
- Select or Develop marketing techniques to reach specific populations of clients
Sample Learning Outcomes for a history course: by the end of this course students will be able to use their knowledge of early Canadian history to…
- Interpret written accounts of historical events in light of cultural dynamics
- Assess (and estimate) the bias or orientation of a given author
- Develop arguments for current policies or political positions based on historical context
[Developed by Bill Roberson and Jim Sibley]
Building your Readiness Assurance Process
Buy IF-ATs from Cognalearn
In this phase you need to:
- Select appropriate readings
- Develop a list to topics to test
- Develop a test plan
- Write RAP questions
- Get ready for the classroom
Selecting the Right Reading
You need to identify what specific knowledge students will need to effectively engage with the 4S activities. This is not everything they need to solve every activity but what they require as an entry point to the problem-solving conversation. You do this by mapping back from the 4S application activity to important foundational knowledge that the students will need to be successful. When you are clear on the knowledge students need to know, you are then ready to select appropriate preparation materials.
Next, you need to select appropriate preparation materials. There is an iterative loop with the following step as you refine the concepts to be tested and then select and refine the preparation materials. You can use a variety of preparatory materials including readings, videos, lecture recordings, or narrated PowerPoints.
Over the years we have discovered that less is more with readings. The amount of readings that students will tolerate depends on the particular discipline and institutional context. Our readings are closer to 25 pages for 2 weeks, which is down from our original 75 pages for two weeks. We found that students were spending a short, fixed amount of time completing readings without regard for the complexity and length of readings. Remember the Readings and the Readiness Assurance Process is not trying to be comprehensive. It is just giving students an entry point to the problem-solving conversation.
One aside – when teachers are first introduced to the idea of the flipped classroom, they are often concerned about how to cram their 1-hour lectures into a 10–12-minute preparatory video. This is the wrong way to look at it. These short preparation materials are just to get students started. It is not all that students learn in a module, so 1 hour of lecture content is too much. Students will learn the additional content during the 4S team tasks.
Identifying Topics to Test
Once you have selected readings for the week’s preparation, skim the readings and make a list of critical ideas that students need to get from the preparatory materials. Often after skimming, you can do a slower read, listing important concepts, definitions, and ideas that the student needs to get started. You use this list both to develop questions that check students’ understanding of critical concepts, principles, factual understanding, laws, rules, etc. and to develop a preamble/wrapper for reading, so students know what to pay attention to.
The test should be a mix of approximately 20% remembering (did you do the readings?), approximately 60% understanding (did you understand what you read?), and finally, 20% application. The application questions can be in the form of “Which concept applies to this situation” (are you ready to use what you have read?). To use a book analogy, you want to write these tests more at the table-of-contents level than at the index level.
You can include a few simpler questions that just provide simple accountability that the student has completed the readings. Try to ask about topics that students are likely to interpret incorrectly. Test common misconceptions that might undermine students’ ability to successfully begin problem-solving. You can ask which concept applies to a given situation or scenario. You can focus on the relationship between concepts; this is an efficient way to test two concepts at once.
Writing Good Questions
Multiple-Choice questions have two main parts: the question stem or leader, and the options (which include a correct answer). When beginning to construct a multiple-choice question, write the stem of the question first. A well-constructed stem is a stand-alone question that could be answered without examining the options. The wording of the stem and the verbs it contains determines the overall difficulty of the question.
Bloom’s Taxonomy (lower levels)
Remembering
- recalling, defining, recognizing, listing, describing, retrieving, naming
- Common Question Leaders: How is…? Where is…? When did … happen? How would you describe…? Can you select….? Why did….?
Understanding
- explaining ideas or concepts, interpreting, summarizing, paraphrasing, classifying, explaining, locating, identifying, restating
- Common Question Leaders: How would you classify…? What facts or ideas show….? Interpret in your own words…? Which statement supports…? How would you summarize…? What is the main idea of…?
Applying
- using information in another familiar situation, implementing, carrying out, using, executing, translating, employing, illustrating
- Common Question Leaders: What is the best first step? What is the most significant problem? What would be the worst thing to do? Would it be a mistake to…? What is the most common mistake? Which test would you order next? What is the most common diagnosis? How would you use…? How would you solve it? What is the most logical order? What approach would you use..? What would result if….? What facts would you select to show…?
This next section highlights some of Bill Roberson’s excellent work.
Writing Questions at Different Levels Low-level Questions
- What did the text say? (Remembering)
- What did the text mean? (Understanding)
- How could you apply it? (Recognize an example of a concept)
Low-level Questions that Invite Discussion
- Which statement is most accurate?
- Based on the theory that you just read about, what is most likely to happen if we apply X?
- Which of these items best represents the qualities/characteristics of X?
Higher-level Questions that Invite Discussion
- Based on what you have read about theory A, which of the strategies listed below has the best chance of success, given the specified conditions (X, Y, Z)?
Another Great Question Writing Framework (Gronlund)
ILLUSTRATIVE KNOWLEDGE QUESTIONS
Knowledge of Terminology
- What word means the same as ________?
- Which statement best defines the term ________?
- In this sentence, what is the meaning of the word ________?
Knowledge of Specific Facts
- Where would you find ________?
- Who first discovered ________?
- What is the name of ________?
Knowledge of Conventions
- What is the correct form for ________?
- Which statement indicates the correct usage of ________?
- Which of the following rules applies to ________?
Knowledge of Trends and Sequences
- Which of the following best describes the trend of ________?
- Which is the most important cause of ________?
- Which of the following indicates the proper order of ________?
Knowledge of Classifications and Categories
- What are the main types of ________?
- What are the major classifications of ________?
- What are the characteristics of ________?
Knowledge of Criteria
- Which of the following is a criterion for judging ________?
- What is the most important criterion for selecting ________?
- What criteria are used to classify ________?
Knowledge of Methodology
- What method is used for ________?
- What is the best way to ________?
- What would be the first step in making ________?
Knowledge of Principles and Generalizations
- Which statement best expresses the principle of ________?
- Which statement best summarizes the belief that ________?
- Which of the following principles best explains ________?
Knowledge of Theories and Structures
- Which statement is most consistent with the theory of ________?
- Which of the following best describes the structure of ________?
- What evidence best supports the theory of ________?
ILLUSTRATIVE COMPREHENSION AND APPLICATION QUESTIONS
Comprehension Questions
- Which of the following is an example of ________?
- What is the main thought expressed by ________?
- What are the main differences between ________?
- What are the common characteristics of ________?
- Which of the following is another form of ________?
- Which of the following best explains ________?
- Which of the following best summarizes ________?
- Which of the following best illustrates ________?
- What do you predict would happen if ________?
- What trend do you predict in ________?
Application Questions
- Which of the following methods is best for ________?
- What steps should be followed in applying ________?
- Which situation would require the use of ________?
- Which principle would be best for solving ________?
- What procedure is best for improving ________?
- What procedure is best for constructing ________?
- What procedure is best for correcting ________?
- Which of the following is the best plan for ________?
- Which of the following provides the proper sequence for ________?
- What is the most probable effect of ________?
From: How to make Achievement Tests and Assessments – 5th edition by Norman Gronlund
IF-ATs (aka Scratch Cards)
Immediate Feedback Assessment Technique (IF-AT)
A special kind of scoring sheet, known as an IF-AT form (Immediate Feedback Assessment Technique), is typically used for the team Readiness Assurance tests. IF-ATs are ”scratch-and-win”-style scoring sheets. They dramatically increase the quality of discussion in the tRAT process and, more importantly, provide rich, immediate corrective feedback. Students absolutely love using these test cards. You can expect high-fives and cheering as students complete the tRAT. We have even had some students thank us for the test! If you have not tried these, you must!
These “scratch-and-win”-style answer sheets were invented by Mike Epstein at Ryder University. On an IF-AT form, each question has a row of boxes that can be scratched like a lottery ticket. A small star, exposed by scratching one of the boxes, indicates the correct answer. Students must scratch off the opaque coating one box at a time in hopes of finding the right answer. The power of these cards is in the conversation that students are forced into as they try to generate shared understanding and consensus before choosing which box to scratch. The other powerful feature of these cards is the immediate, corrective feedback.
Decremental scoring is used to induce teams to continue to discuss the questions after an incorrect scratch. One possible point-allocation system for an IF-AT card could be four points for the right answer on the first scratch, two points for the right answer on the second scratch, one point for the right answer on the third scratch, and zero if they needed to scratch off all four boxes to reveal the correct answer. This encourages teams to engage with a question and continue the conversation until they know the correct answer.
Teachers new to TBL often ask how to print IF-ATs to match their tests. Each set of numbered cards already has the stars in a particular pattern and it is the teacher who arranges the answer choices of the test to match the selected card. Cards are available in many different answer patterns to give the teacher flexibility in arranging answer choices and to prevent the students from memorizing or predicting the answers. Each card has an identifying key number on a perforated tab at the bottom that can be removed by the teacher. The IF-AT cards are available in lengths of 10, 25, and 50 questions and with either four options (A-D) or five options (A-E). IF-AT forms are available at cognalearn.com/IFAT. For the use of the Faculty of Applied Science, we provide all lengths of IF-AT cards and please contact CIS for more information.
There have been some alternatives suggested on the TBL listserv:
- “There are also some colour-changing markers that work with invisible ink. You mark the right answer in invisible ink and the students use the marker and know it’s the right answer if the ink changes color. “
- “I recently just made my own IF-AT scratch-off forms since Epstein wasn’t selling them anymore. My classes are small enough that even though it’s a process, it’s still feasible for me to do it (I have roughly 40 students per class). You can do this pretty easily in Microsoft Word. Four cards fit on one 8.5×11 sheet of cardstock. You can’t see through coloured cardstock (at least on the blue and green cardstock we had in our office supply area). Then you can order the scratch-off stickers from Amazon for about $20, cut them into strips, and stick them on the cards. I have a TA who does that part because even though it’s not difficult, it’s fairly time-consuming. This semester is my first time doing these cards and the students love it!”
- “Not sure if folks are aware of the Group RAT site. This is a wonderful site that takes the concept of immediate feedback testing online. Wonderful site, super user friendly (once you learn how to set up your RATs in the right format) A hardy thanks to Gary Theilman for setting up this free site!”
- “I used Qualtrics last year out of necessity during online teaching, and I decided to continue using Qualtrics (instead of scantron and IF-AT) this year by choice even though my university has returned to in-person teaching. The Qualtrics approach works great, and also saves paper“
- “Here is a link with a new iRAT using Qualtrics video that reviews set-up and shows how to add up the scores in Excel: loom.com/share/837689a202f54433a3f5da1827dc1bb4“
See IF-ATs in Action:
Frequently Asked Questions
What are common student complaints about RATs?
Students will say “Testing before teaching makes no sense” – you will hear it, if you don’t properly sell the idea of TBL and explicitly highlight the purpose of the Readiness Assurance Process. These are low-stakes tests that get students ready for the main course – learning how to apply the course content in the Application Activities.
Good students sometimes worry about lower grades on iRATs and voice these concerns. Our iRAT average is typically 65-70% and tRAT averages of 95-100%. Good students sometimes need to be reassured that the RATs don’t count for much, their focus is on learning, and the high team scores will pull up their RAT grades.
How often should I give RATs?
A common early mistake is to give too many RAPs. Giving RAP tests every week is usually too often unless classes are long and only meet weekly. Typically we do a RAP every 2-3 weeks in a regular 13-week course. Remember the Readiness Assurance Process is just about getting students the minimum they need to begin problem solving. The students will learn plenty more during the Application Activities. In certain course configurations with long class meetings once a week, short readings and weekly RAPs can make sense. Better to have too few, than too many – remember these aren’t about testing, they are about getting your students ready for problem-solving.
How much should the RATs count?
Not too much – If you assign a large grade to each RAP, you can turn it into high-stakes testing. Assign just enough to make it worthwhile for students to do the readings and prepare. The typical range for a RAT is 2-5% for iRAT and 2-5% for tRAT. We have always used 1.5-2% for each RAT.
What kinds of questions are good questions for the RATs?
RAP questions are typically constructed at Bloom’s levels Remember, Understand and Light Application. The RAP test highlights concepts more at a table of content level than index level. Remember these questions are just to get students ready for the activities that follow. These are not final summative tests of all that has been learned.
Design and Getting the Most Out of 4S Activities
In this phase you need to:
- Identify the kinds of disciplinary thinking you are trying to promote
- Begin writing 4S scenarios where students apply what they know to analyze a situation and make concrete decisions
- Create facilitation plans
Read before you get started
- Roberson and Franchini’s – Effective Task Design for the TBL classroom
Imagining 4S Possibilities
During a 4S Application task, students get to concretely apply what they have abstractly learned from the readings. Because of the abstract nature of understanding, it is not “teachable” in the conventional sense. An understanding can be gained only through guided inference whereby the learner is helped to make, recognize, or verify a conclusion. (Wiggins and McTighe, 2013). You want students to connect abstract concepts from the readings with concrete experience during the 4S team Application tasks. Making connections during 4S team tasks is important to consolidate student learning. Helping students see gaps in their knowledge motivates the students to look up what they don’t know and then immediately putting that knowledge into action tests and deepens their understanding. You need to present a scenario that creates the context in which what students “know” abstractly (via their readings) is put to the test when they try to “use” it in concrete, specific cases. Your job is to find or, if necessary, fabricate these scenarios.

Example 4S prompts (note the use of superlatives or implied superlatives to force a specific choice)
- A patient comes into emergency with the following symptoms…
- What is the first thing you would do? And why?
- What is the first test you would order? And why?
- What would be the worst thing to do? And why?
- Given 3 possible programs to end homelessness in your city, select the program that is the best and will likely be most strongly supported by local agencies and Civic leaders. (Michaelsen and Sweet)
- What is the most relevant theory that explains the behaviour in the video? (Kubitz and Lightner)
- Which of the following best describes the opportunity cost of coming to class today? (Espey)
- Which of the following should the University do to best increase the quality of Undergraduate education? (Mahler)
- Which sampling scenario would best address this research project? (Mahler)
- Given three valid historical interpretations of the progressive movement, discern which best describes the Progressives revealed in our manifesto. (Restad)
- In Clarence Page’s op-ed piece “The Problem With Trashing Liberty”’ Where does the responsibility for a safe a civil society lie? Which of the following three philosophers (X, Y, and Z) does Clarence Page most agree with on these fronts? (Roberson and Reimers)
- Which of the following passages in the Bhagavad Gita best illustrates reflection about the nature of Krishna’s divinity? (Dubois)
- Rank how useful each source is for understanding the fears of the Cold War era. (Restad)
- Which teacher should be nominated for a teaching award? (Croyle and Alfaro)
- Which indicator (from a list of 5 plausible alternatives) is most critical to making a correct diagnosis in this case? (Michaelsen and Sweet)
- If a moving vehicle overloaded this bridge structure, which component would likely fail first?
- You are making a home assessment, which of the following safety hazards would be of greatest concern? (Clark)
- After assessing Mrs. Randall’s dining room what would be your first recommendation to protect her from falls? (Clark)
- What line on this tax form would pose the greatest financial risk due to an IRS audit? (Michaelsen and Sweet)
- Given a set of real data, which of the following advertising claims is least (or most) supportable? (Michaelsen and Sweet)
- You are consulting for a new business owner who wants to open a dry-cleaning store in Norman, Oklahoma. Where would you recommend locating a new dry-cleaning business? (Michaelsen)
[Developed by Bill Roberson and Jim Sibley]
Writing 4S Activities
First, you may need to make your original Learning Outcomes more CONCRETE.
Next, you need to create problem scenarios/situations where students’ factual knowledge (from the RAP process) is useful, but may be insufficient to solve the problem definitively.
Next, when creating these scenarios you want to clarify exactly what you want students to be doing.
- Evaluate/judge something (object, product, creation, situation)?
- Analyze or diagnose a situation?
- Interpret something (text, artifact, data set)?
- Solve a particular type of messy problem?
Next, identify the concrete information/data sets the students will work with:
- Texts (such as cases, descriptions, excerpts from a textbook, writing samples, etc.)
- Images (visualizations, diagrams, videos, etc.)
- Data (spreadsheets, graphs, charts, etc.)
- Objects (products, specimens, etc.)
Next, you need to pick the format of students’ actions:
- Will they compare?
- Will they sort?
- Will they rank?
- Will they score?
- Will they choose the best course of action?
- Will they distill and represent in a written format?
Next, determine how to make student thinking/decisions visible so it can be represented in a simultaneous report. Can their answer be represented with?
- Colour Voting Cards
- Single Number
- Single Letter
- Single word or phrase
Sometimes this means converting a complex response into a simple response. For example, after a ranking task, ask students to report their #1 choice, rather than their entire ranking scheme. If you’ve asked students to compile a list, ask them to choose the MOST critical item on their list and report it. Every task needs to lead to a moment of sharp differentiation: “I choose this over that.” Getting the students to this moment sets up “WHY?” as the teacher’s entry point for interactions leading to student analysis, reflection, and critical thinking. The simultaneous report naturally lets teams compare their decisions and decision-making process to other teams.
Finally, it is good to develop a facilitation plan for debriefing the 4S Application task, to ensure students learn the most they can from the task. Debriefs always begin by asking ALL teams to simultaneously report their answers/decisions. A good plan provides you with a way to organize the discussion that follows, and direct students into a dialogue with each other.
[Developed by Jim Sibley and Bill Roberson]
Anatomy of a Great 4S Activity
It is recommended that team tasks be constructed to conform to the TBL 4S model. The 4S’s stand for present a Significant Problem, all teams get the Same Problem, teams are asked to make a Specific Choice (constrained choice), and then teams commit to their decision by publically and Simultaneous Reporting it. This framework is not just for TBL teachers. It can be used any time you want to design powerful classroom activities and discussions.
In the TBL model, the structure of the team task gives individuals and their team the opportunity to analyze a scenario, then make a difficult judgment, and finally publicly commit to a decision on an appropriate choice or course of action. This public report of a team’s decision creates an intense reporting conversation where students get specific and timely feedback on the quality of their thinking and their process for arriving at their decision. It is during this reporting conversation you have a facilitation opportunity to help students deepen the discussion by applying the principles of critical thinking.
Example Task

You are head of Engineering for a large dam project on the Yellow River in the Ningxia province of China. The dam is to be located in the Yiling district near the exit of the Ordos Loop section of the river. The dam is to be located at 34°49′46″N 111°20′41″E. The Yellow River is China’s third largest river. The river is characterized by extremely high silt loads, especially in spring floods. The local bedrock is a highly fractured gneiss. The dam will be a concrete earth-fill hybrid design. You have been asked to determine some of the main design parameters, including safety-related questions like what flood event return period to build the dam to withstand.
What flood return period would you recommend the dam be designed to withstand?
- once in 50 year flood
- once in 100 year flood
- once in 200 year flood
- once in 500 year flood
Requiring Complex Analysis
The example looks like a simple multiple-choice question, but it isn’t a simple question. Coming up with a good solution requires the integration and analysis of many different factors and the weighing of tradeoffs (like cost vs. safety). There are a lot of things for the teams to consider in determining a reasonable course of action and coming up with a reasonable defence for their decision.
Important considerations could include:
- How big are the flood events?
- Are changing climate patterns going to affect the size and frequency of flood events?
- What is the difference in cost to design to withstand the different levels of flood events?
- Are there unique landscapes or bedrock concerns? How could we mitigate them?
- What are the population patterns downstream?
- How would downstream populations be affected by a failure at different flood levels?
- How do these kind of dams typically fail?
- Can the dam be constructed to fail elegantly and reduce the threat to downstream populations during flood events?
“Scenarios allow you to embed many variables that can be used to introduce multiple concepts, theories and perspectives into students’ discussion, as well as to complicate the task, if desired, through a mix of relevant factors and red herrings.” (Roberson and Franchini, 2014, p. 287)
Using Concrete Scenarios that Require Concrete Action
We are looking for concrete scenarios that require students to use the concepts and abstraction from the preparatory material to understand, analyze, and solve. The quality of the problem ultimately controls the effectiveness, energy, and learning outcomes of an activity.
“Students, therefore, need to be required to act frequently in ways that generate consequences that provoke reflection and demonstrate visibly their thinking. The more focused and concrete the action, the more visible will be the thinking and the learning—and the more immediately useful will be the feedback.” (Roberson and Franchini, 2014, p. 276)
“Effective team tasks point students consistently toward making decisions that reveal reasoning and understanding in service of a judgment.” (Roberson and Franchini, 2014, p. 279)
“What we know about the nature of learning is that students gain deeper traction, faster, with course content if their first encounters with it include concrete experiences framed by and informed by the abstractions” (Roberson and Franchini, 2014, p. 296)
Using Expert-like Problems
Another nice feature of this example is that it asks the kind of question an expert would need to ask.
“Disciplines are more clearly defined by how those working within the discipline collect, organize, assess, and use information” (Roberson and Franchini, 2014, p. 278)
Students need to use their understanding (gained in the pre-readings, lectures or previous activities) to make expert-like concrete decisions that will have very concrete consequences. You want to design concrete scenarios where conceptual and abstract understanding helps students make better decisions.
“If we want our students to become more expert in our disciplines, we need to structure their encounters with content in ways that change what they can do with knowledge.” (Roberson and Franchini, 2014, p. 278)
Constraining choice to intensify discussion
The example at first glance looks a lot like a multiple-choice question and many teachers worry that constraining choices like this will limit the depth of the discussion. It is quite the opposite, constrained choices focus student energies on the analysis of specific issues, which ultimately helps with team-to-team comparisons that allow students to see how their thinking contrasts with other teams. This really becomes clear for all to see during the public reporting of team decisions.
“The function of the collective decision task, therefore, is to place a restrictive frame around the team’s action. This restriction forces the team to evaluate, integrate and, if needed, respectfully discount a team member’s inputs en route to a judgment and a focused decision.” (Roberson and Franchini, 2014, p. 288)
“Tasks that direct students toward a specific choice do not stifle student thinking but concentrate it so that feedback on the task can be directed at specific, anticipated discoveries and realizations.” (Roberson and Franchini, 2014, p. 290)
More Simultaneous Reporting Ideas
Maps and Push Pins
You are consulting with a new business owner who wants to open a dry cleaning store in Norman, Oklahoma. Where would you recommend they locate a new dry cleaning business (and why)?
- Specific Choice – Push Pin in map

Voting Cards
You are an English teacher. You are working with your students to develop their understanding of the Active and Passive voice. You are trying to develop their next assignment. Which assignment wording would best promote higher-level thinking and a rich reporting discussion?

- List the mistakes that writer frequently make that detract from their efforts to write in an active ‘voice’
- Read the following passage and identify a sentence that is a clear example of: a) active, and b) passive ‘voice’.
- Read the following passage and identify the sentence in which the passive ‘voice’ is used most appropriately.
- Specific Choice – Show Voting Card
Whiteboards
Given the following investment portfolio, investor profile, and market conditions which stock would you sell first and when?
OR
A patient presents at the ER with the following symptoms. What would be your first course of action? What test would you order first?
- Specific Choice – Write decision on whiteboard

Gallery Walks
Sometimes when problems require a bit more writing you can do gallery walks. Student teams present their plans on flipchart paper. This can be effective since it requires teams to distill their decision down to ideas that can be captured on a flipchart and the public reporting helps teams take the task seriously.

Hot Seat Reporting
Use numbered balls to randomly select student teams to report. Teams can display their completed worksheet with analysis using a document camera and walk their classmates through their work. After a few teams, there is often convergence in presented rationales and decisions and an instructor opportunity to provide closure.

Scissors and Glue Sticks
Students bring individually prepared documents and are given class time to distill documents down to a team version. This gets students reading each other work and working with grading criteria to identify valuable parts of each document for inclusion in team submission.

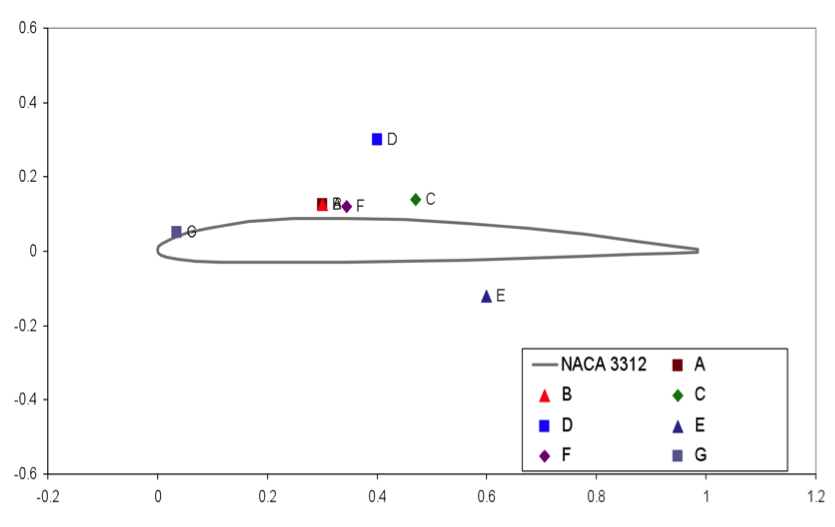
Excel Charts
Given this airfoil shape. What would be the optimal placement for a Pitot tube (airspeed measurement device)? Provide an x/y coordinate.
- Specific Choice – x/y coordinate on EXCEL chart
Stacked Overheads
Given the following x-ray. Identify the most clinically problematic area. Circle the area with a colored pen and be prepared with a rationale to defend your analysis.
OR
You are a consulting geophysicist to a mining company that is looking for new ore deposits on their property. Given these geophysics results, what area of the log is of most interest and what trends are most significant? Identify the most important area and trend.
- Specific Choice – Circle area on transparency, instructor stacks transparencies for simultaneous report

Planning for Class
Planning Class
You should use a lesson-planning model known as SET-BODY-CLOSE to effectively plan each class. This lesson-planning model is described more fully in Sibley and Ostafichuk’s Getting Started with Team-Based Learning (2014, p.123-124).
Here is an example lesson plan structured using the SET-BODY-CLOSE model.
SET
During the SET we set the stage for the class by conveying why the topic is important, how learning this topic has important future utility for the students, how this topic relates to students’ prior knowledge, what the intended outcomes are, and finally set the students to work.
In this case, the class could open with a presentation of the problem task maybe showing images of the river location, images of similar dam types, some examples of dam failures (images, news clippings), and then highlighting how difficult and important these kinds of engineering decisions are to make methodically and systematically. Then the class is carefully put to work – clearly state how much time they will have to complete their analysis and make their decision, remind students that they will be required to publically report their decision, and they will need to be ready to defend their decision and critically examine the decisions of other teams.
Keep the problem displayed during team deliberations and have a timer visible, so teams can budget their time to complete their analysis and arrive at a decision within the allotted time. (Roberson and Franchini, 2014). “Requiring teams to produce an answer—publicly—within a given time helps them maintain focus and also sends the message that “we can’t” isn’t an option. To create an even greater sense of urgency, always allow less time than you think they really need to answer a given question” (Roberson and Franchini, 2014, p. 298).

BODY
This is the major portion of the activity and has the students deliberate within their teams, then make a decision, then publically report their decision (simultaneous reporting) and then be ready for a discussion where their decisions and their rationales will be examined and discussed. The instructor can prepare a discussion facilitation plan to ensure the post-reporting discussion is as productive as possible.
“If you have not anticipated what students’ responses to the task will be, you may not be ready to debrief their decisions effectively.” (Roberson and Franchini, 2014, p. 297)
CLOSE
During the CLOSE we summarize what has been learned. You could perhaps, ask students to list the most important things they learned. Revisit the themes of the SET – why the topic is so important, what the future implications of our decisions could be, and possible next steps or calls to action. Highlight all that has been accomplished and thank students for their efforts.

Using ORID Framework (Stanfield, 2000) to Generate Discussion Questions
You should have some discussion questions ready to gently guide reporting discussions in case they drift to unproductive territory or if the depth of analysis to inadequate. Stanfield’s (2000) ORID framework can be used to generate a series of questions that systematically and methodically examine any issue. But remember the major difficulty for most instructors is they intervening too early. Don’t do it. It can “diminish a team’s sense of ownership of their own responses.” (Roberson and Franchini, 2014, p. 298).

Objective
- What are the facts?
- What sources of information are important to help us make a good decision?
- Where would you like to have more information?
- What assumptions are being made?
Reflective
- Would you be comfortable making this decision with limited information?
- What information would you like to have?
- What should concern us? What tradeoffs need to be considered?
- How has the situation been dealt with in the past?
Interpretive
- Is there another important perspective we aren’t considering?
- What would happen if we changed…..?
- What effects will these changes have? Who else will be affected?
Decisional
- How do you justify your decision? What are your main arguments?
- What was your first choice?
- What was your second choice?
- Was there disagreement inside your team about the best choice?
Facilitation Advice
“The design of a task is ultimately only as good as its execution and management” (Roberson and Franchini, 2014, p. 297).
Many people new to TBL worry about facilitating the discussion after simultaneous reporting. Although we all have much to learn about facilitation, the good news is the 4S structure of TBL activities leads discussions that are simpler to facilitate than open general discussions.
The first thing you do following the simultaneous report is announce the patterns you see…I see mostly A’s and C’s with a few D’s…..then you begin asking teams why they made their decision…..going team to team….building a reasoned argument together with your students.
When teams commit to their positions and publically report it, the instructor can then facilitate the report by simply going from team to team asking “Why did your team pick A” and going to another team “Why did you pick B”. You work the room going side to side and making sure to engage all parts of the room. Try to resist talking to teams next to you. This can become a conversation between the instructor and one team and not a conversation between all teams. One trick is to ask teams across the room to add their two cents. This helps the reporting conversation stay between students and not between the instructor and one team of students. You can ask a team to tell you about their team’s deliberations – what did they talk about, how did you decide…What is nice about this is you are only asking them to recount the conversation, not what is the right answer.
When discussion energy begins to wane you can begin to ask “Why didn’t you pick…” or “Was there a second choice that your team considered?”…” Why do you think someone might pick that choice?” These are the same kinds of questions that you need to use to play devil’s advocate if all the teams agree.
Another important consideration is to close the discussion well. You want to make sure students get reminded of the important takeaways, the assumptions examined, and the inferences that need to be made. You can summarize or even better have the students paraphrase a summary of the discussion. Reflective one-minute paper can be used to great effect here. You can simply ask students to quickly individually list the “3 most important points” or “2 remaining concerns” or “a context where it might not be applicable.” A nice finish to this activity is to have teams compile these points into a team consensus worksheet. However you do it, not closing activities will rob them of some of their value.

From Jim Sibley and Loretta Whitehornes facilitation posterfrom the 2012 TBL conference.
Frequently Asked Questions
What makes a good application question?
Often questions that ask – pick the best course of action from a list of reasonable courses of action. You want the team to use large complex and incomplete data sets, be forced to use inference, make assumptions explicit and use measured judgements to arrive at that “simple” decision. These kinds of analyses can lead to powerful reporting conversations. Remember that the 4 S are not optional. People who are new to TBL, but not new to teamwork often create activities that don’t include some of the S’s. Don’t. The 4S structure lets you consistently generate great activities and reporting discussions. In the interview for my book, people with more TBL experience most often had greater fidelity to the 4S structure. The 4S framework gives you some structure to relax into. When a teachable moment comes by, you are often in a better position to capitalize on the opportunity.
What kinds of questions don’t work for application activities?
The most common problem is questions that are too simple. If a student can sit back and watch the brightest student in the groups solve the problem, many students will do exactly that. This unleashes all sorts of group dysfunction.
Should I grade application activities?
Depends. There is a diversity of opinion on this issue. We have never graded application activities, but we do collect a worksheet from each team after each one. We tell students that the only time we may look at this worksheet is when students are close and want the bump to the next higher letter grade. We have had no issues with students’ willingness to engage in ungraded application activities.
If you do grade the activities, you need clear deliverables and grading rubrics to accurately assess each team’s submission. Many people have started with graded applications because they worried that students would not engage with activities unless they were worth marks. This turns out to not be true and ungraded applications let you turn up the difficulty of the application without the backlash from students when they “get the answer wrong” on graded difficult applications. Remember, the goal here is a great reporting conversation, not getting the right answer.
Developing Your Team Formation Plan
In this phase, you need to:
- Decide on team composition requirements
- Create student sorting questions
- Select a team formation plan
- Be ready to respond to student challenges
Optional Reading
- Assigning Students to Groups for Engineering Design Projects: A Comparison of Five Methods by Brickell, J.L., Porter, D.B., Reynolds, M.F., Cosgrove, R.D.
Team Composition for TBL
- Teams should be five to seven students.
- Teams should be teacher and criterion created.
- Teams should be diverse.
- Teams need to be permanent.
Building Questions to Sort Students
1) Decide Your Sorting Questions
Ahead of time, decide what characteristics would make the course easier or more difficult for a student. For example, previous degrees, work experience, comfort with a certain subject area (stats, math, writing, science, etc.), a specific kind of skill, being from a different culture, having a different native language – anything that might make the course experience easier or more difficult.
2) Prioritize Your Sorting Questions
List these characteristics in order of importance, mixing the “benefit” and “detriment” characteristics together into one list, with the most important characteristic at the top. You must prioritize because many students will have more than one characteristic on your list (e.g., a professional in the field who grew up speaking a different language). Phrase these characteristics carefully, to avoid embarrassing any one group of students.
For example, one anthropology teacher uses “did not grow up in Oregon or any of the immediately surrounding states” instead of “speaks English as a second language.”
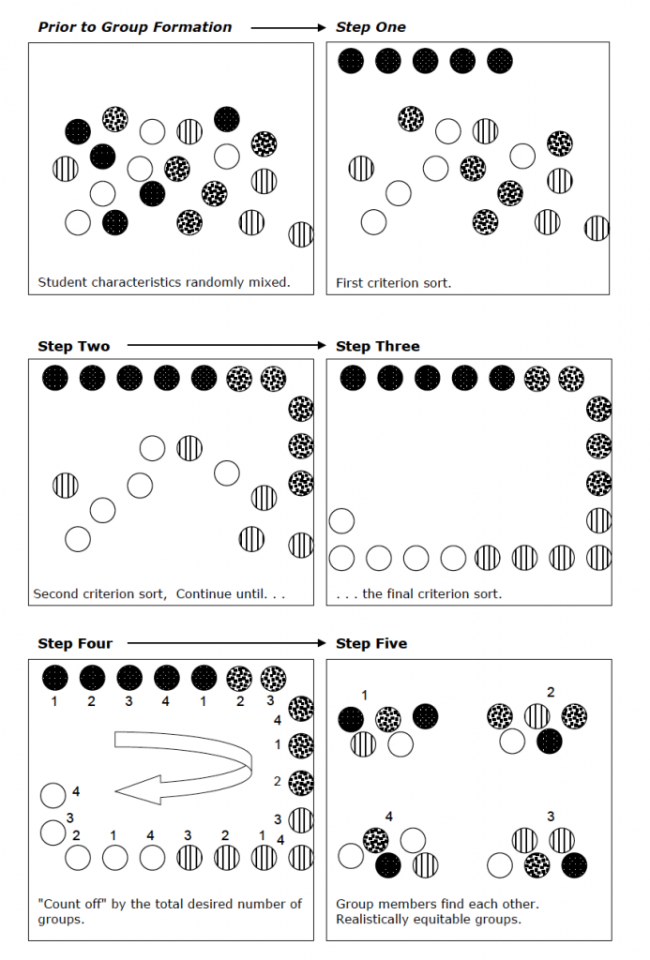
Small Classroom Team Formation
In smaller classes with reasonable classroom space, you can simply line the students up. You can use various prompts to quickly order the line, such as:
- I want everyone with work experience at the front of the line.
- With the remaining students not yet lined up, who has a previous degree? Please line up behind them.
- With the remaining students not yet lined up, who has lived overseas? Please line up behind them.
- Everyone else lines up at the end of the line.
Students will often fit into multiple categories, but you will begin the line with the categories that are most important for team success. This is not an exact process and doesn’t need to be. You are creating diverse teams with a range of talents. The questions and criteria you choose to use to order the line depend on who your students are and what assets and liabilities you want to distribute across all teams. Once the students are in the line, you do the simple math of how big the class is and how many teams you can have with five to seven students on each team. Once you know the number of teams you want, you simply count off the teams.
For example, in a class with 42 students, you have decided to have 7 teams with 6 students on each team. Now you would count off from the start of the line: 1, 2, 3, 4, 5, 6, 7, 1, 2, 3, 4, 5, 6, 7 until you run out of students. Don’t worry about being exact. The literature shows that randomly-formed teams perform almost as well as teacher-formed teams. So there’s no need to obsess over every last student getting into the exact right group. You might keep track of your most important sort criteria and do a few last-minute shuffles that might be necessary to get teams of equal strength. As an example, in a foundation engineering course, we might shuffle a few people at the end of the team formation process to ensure that each team has both a geological engineer and someone good with math.
This simple procedure has been used with great success in TBL classrooms for over 30 years. It might feel like it takes up valuable class time, but students really seem to enjoy the team formation process, and it is important that students know the teams were formed fairly and transparently. Once teams are formed, students will sit back down with their team, and we will give them a few minutes to do introductions inside their teams. Some teachers will at this point also ask the teams to come up with a team name.
Large Classroom Team Formation
In large classes, it is often impractical or impossible to line the students up around the room. We then use an online survey to gather some student information that is used to order students in an Excel file, for example. We often use online survey tools in a Learning Management System (LMS), such as Blackboard, Canvas, or Moodle, to gather the information. This must be set up as a quiz, since with a survey we cannot trace specific responses to specific students (I will use the word “survey” with the students to stress the non-graded nature of the quiz). We decide on the assets and liabilities that need to be distributed across the teams. We ask a series of questions to find out more about these assets and liabilities in our students. For instance: what is your major? Do you have work experience? Have you lived overseas? We ask whatever questions we feel are necessary to get the information needed to build balanced and diverse teams. Sometimes we want to make sure each team has someone with work experience, someone who is good at stats, or who has a laptop they can bring to class. Once we have the student responses, we perform nested sorts in Excel to order the list, and then we simply count off the teams.
For example, I download the survey/quiz results for the 180 students in my course. Then I build a sort based on the column order that I feel is the most important, first sorting on most important criteria, then on second most important, then on third…etc. This kind of sorting is extremely simple in Excel™. You can sort by multiple columns by simply using the + control on the Excel™ sort dialog box and adding columns in the order from most to least important. Below is an image of the sorting dialog box from Excel™. In this example, I first sort on work experience, then previous degree and finally gender. This lets you in one simple step do a sort that is similar to ordering the line of students in the classroom.
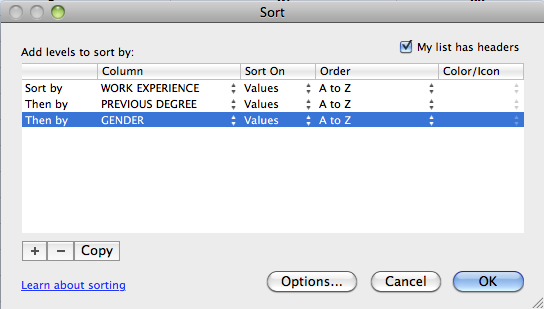
Once sorting is complete, I simply count off on the Excel™ table. In the case of this course of 180 students, I may decide to do 30 teams of 6 students. Next, I would count down the sorted Excel™ results numbering the students 1, 2, 3, and up to 30, and then repeating the 1 to 30 numbering as needed for the entire class list. The list is then sorted into alphabetical order by student name, and the resulting roster of teams 1-30 is posted to the LMS.
When using any team formation method that isn’t done in front of the students, you should inform them of the procedure you used to form the teams. Students need to feel that the teams were fairly created.
Students will need to know where to find their team in large classrooms. To help with this, we create classroom maps that show exactly where each team should sit (see figure below). We post this along with the team assignments on the course website or LMS before the first Readiness Assurance test. We also display this map on the classroom screen when students arrive at the first Readiness Assurance test, so they can find the correct place to sit. In large classes, we have students sit with their teams right from the start. This prevents any disruption at the end of the individual Readiness Assurance Test from students changing seats.
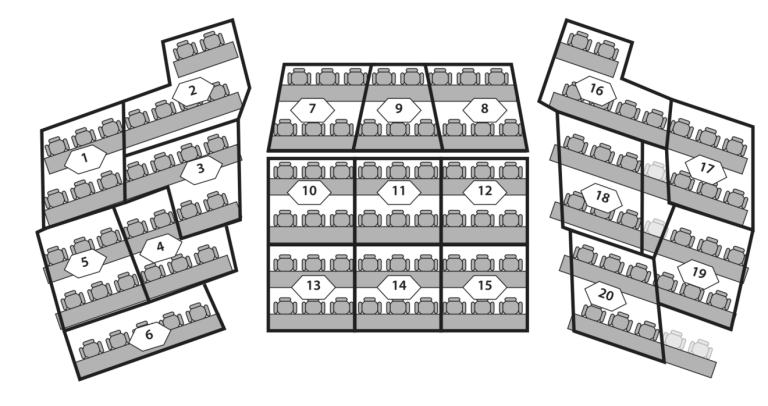
There is one interesting mistake in the above diagram. Can you spot it?
The diagram is built from the instructor’s point of view. When displayed in the classroom, students need to translate in their head left to right and top to bottom to actually locate their team. We now build these class maps with the students in mind.
Frequently Asked Questions
How should I form teams?
Teams should be formed by the instructor. You must resist student preference for student-selected teams. The literature clearly shows that in the long term, criterion-formed teams outperform student-selected teams. When you create teams, you need to think about the student assets that you want to spread across all teams. Maybe each team should have someone with work experience, someone who has lived overseas, or someone who speaks a second language. You need to think about who your students are and what each team will need to have to be successful. Information on the logistics of forming teams in small classes can be found here. Information on the logistics of forming teams in large classes can be found here.
Brickell, J.L., Porter, D.B., Reynolds, M.F., Cosgrove, R.D., (1994) Assigning Students to Groups for Engineering Design Projects: A Comparison of Five Methods. Journal of Engineering Education, 7:259-262
Can I use smaller teams of 3-4?
Teams should be 5-7, really! This is counter-intuitive to most teachers’ experiences using groups where large teams mean some could hide and do no work (known as social loafing). These bigger teams work when you ask the right kind of questions. When team tasks are product-based, small teams are necessary to control social loafing. When team tasks are messy, authentic decisions, big teams work! The teams actually need the intellectual horsepower to solve these big teams.
When I conducted interviews for my book, I always asked questions about team size and have your teams always been that 5-7. I got a very consistent response. People were initially reluctant to use big teams, but on reflection pretty much said the same thing – if I had trouble with a team, it was a smaller team. I now believe in and use the bigger teams.
Should I mix the teams up periodically?
NO – when we first create groups of students there is considerable energy spent on “social overhead” as students work with each other, begin to trust each other, and recognize how to work together, they cohere into a much more powerful team entity that spends a greater portion of their effort on task-focused work. Mixing teams resets teams into groups and they have to cohere all over again. The literature points to 10-14 hours of task-focused work to create high levels of team cohesion. The Readiness Assurance Process and Application Activities all foster team cohesion.
How do I handle students who insist on picking their own teams?
SAY NO – there are a few nice ways to handle this. First and foremost, have your words and rationales ready.
I refer students to: Brickell, J.L., Porter, D.B., Reynolds, M.F., Cosgrove, R.D., (1994) Assigning Students to Groups for Engineering Design Projects: A Comparison of Five Methods. Journal of Engineering Education, 7:259-262. I asked them to write a half-page analysis of why the paper is wrong in recommending teacher-formed groups. If I accept their arguments, I tell them I will let them self-select. No student has ever taken me up on this.
Laura Madson has a nice story she tells. There is a boyfriend and girlfriend on your team, they break up mid-semester – do want to be on that team?
Say NO to self-selection. Be ready for this question and stand your ground.
How do I resolve conflicts among team members?
With Team-Based Learning there often aren’t the kinds of conflicts you see with other forms of group work. Having teams focus on decisions and needing the defend why they made a particular decision really changes things. Give a well-functioning TBL team and bad assignment and you will get dysfunction and conflict, but ask the right kinds of questions (decisions) the right way (4S) and there usually aren’t any conflicts that need managing by the teacher.
Developing Your Peer Evaluation Plan
In this phase, you need to:
- Decide on Peer Evaluation Method
- Select Peer Evaluation Criteria
- Develop and communicate your Peer Evaluation plan
- Be ready to respond to student challenges
Optional Resource
- Approaches to Peer Evaluation: Pros and Cons of Various Methods
Poster by Rick Goedde and Jim Sibley
Select a Peer Evaluation Methods
Peer evaluation is at the heart of keeping students accountable to their teammates for their preparation and contribution to team activities. It is a good idea to carefully explain the evaluation process to the students and perhaps give them a formative opportunity to give each other feedback before the end of the course.
There are a variety of methods that can be suitable in different contexts. You need to consider your goals and contexts to select the appropriate peer evaluation method for your course. Whatever peer evaluation method you choose, it needs to have enough teeth (ability to affect a student’s final grade) to encourage the reticent student to contribute.
Primarily Quantitative
Two methods can be used: a simpler divide-the-money evaluation and a more rigorous rubric-based evaluation.
In rubric-based evaluations, students rate their teammates’ behaviours using Likert scales on a series of questions about the team experience. Typical rubric criteria include:
- Preparation: did your teammates come prepared?
- Participation: did your teammates come to class?
- Contribution: did your teammates contribute to team success?
In simpler “divide-the-money” evaluations, each person is given a fixed sum to divide amongst team members. A typical evaluation prompt might be: “Your project team has received a $1,000 bonus. Divide the bonus amongst your teammates based on their contribution to the project.”
Fink Method
A multiplier is created from the peer evaluation scores and that is used to adjust the overall course grade for a particular student.
Some examples will likely help.
Example 1
In the case of a high-performing student, where the team’s average peer evaluation score might be 10 and that particular student has received an 11 overall, the individual score is then divided by the average peer evaluation and yields 1.1. This is then used as a course multiplier. Therefore the student receives 1.1 times the unadjusted whole team grade (e.g. 80%), adjusting their grade upwards to 88%.
Example 2
In the case of an underperforming student, where the team’s peer evaluation average might be 10 and that particular student might have received an 8, their score is then divided by the average peer evaluation and yields 0.8, which is then multiplied by the team grade. Therefore the student receives 0.8 times the unadjusted whole team grade (e.g. 80%), adjusting their grade downwards to 64%.
Michaelsen Method
A separate team maintenance score (usually 5% of course grade) is created from evaluation results for each student.
The decision to use the Fink or Michealsen method often rests on the percentage of the course grade that is allocated to team products. When the team products make up a significant portion of the overall course grade, it can make sense to use the Fink/Michaelsen Method.
Primarily Qualitative
University of Texas Method
Focuses on providing students with valuable written feedback on their performance (it is not used to adjust student scores). Students are asked to reflect on two prompts for each of their teammates – one thing I appreciate about you and one thing I request. This has similarities to the CONTINUE-STOP-START method. I would like you to CONTINUE to….I would like you to STOP…..I would like you to START….
Koles Method
A hybrid between the University of Texas Method and the Fink/Michaelsen Method. It incorporates both formative written feedback and summative evaluations of performance. Also gives extensive feedback on the quality of the feedback you give your teammates. Paul describes this as a lot of work, but one of his favourite parts of the course each semester.
For more information read the chapter on Peer Evaluation in Getting Started with Team-Based Learning
Pick your Peer Evaluation Criteria
Here are the 3 most common:
- Preparation: did your teammates come prepared?
- Participation: did your teammates come to class?
- Contribution: did your teammates contribute to team success?
Here are other possibilities:
- Fosters good team climate
- Facilitates contribution of others
- Completes tasks on time
- Responds well to conflict
- Displayed positive attitude
- Was consistently helpful
- Expressed thoughts clearly
- Reacted sensitively to non-verbal cues
- Worked hard
- Was dependable
- Overall, a valuable team member
Paul Koles Prompts
Cooperative Learning Skills:
- Arrives on time and remains with the team during activities
- Demonstrates a good balance of active listening and participation
- Asks useful or probing questions
- Shares information and personal understanding
Self-Directed Learning:
- Is well prepared for team activities
- Shows appropriate depth of knowledge
- Identifies limits of personal knowledge
- Is clear when explaining things to others
Interpersonal Skills:
- Gives useful feedback to others
- Accepts useful feedback from others
- Is able to listen and understand what others are saying
- Shows respect for the opinions and feelings of others
Helpful Software
You can use online software to streamline the task of peer evaluation. Often you can set the software up in September and collect the results in April.
iPeer
This free open software was developed at the University of British Columbia and allows you to entirely automate the peer evaluation process. It supports several different evaluation types and has a building block integration with Blackboard Learn. The software needs to be installed on a local server and is based on the typical LAMP stack (this means sometimes to your IT group). You can learn more about it here and download it for free here. This is a good choice for countries with strict privacy laws. In my home province of British Columbia, Canada – any student data needs to be stored on Canadian servers.
CATME
This free US-based web service lets you easily set up peer evaluations for your class. The only catch is you give them the right to do research on the anonymous aggregate evaluation data.

Teammates
This free Singapore-based web service lets you easily set up peer evaluations for your class. This software is relatively new but looks extraordinarily promising.

SparkPlus
This inexpensive Australian-based web service lets you easily set up peer evaluations for your class. This software was developed by Mark Freeman from the University of Sydney Business School to support his TBL courses.

Accountability, Feedback, and Grades
In this phase, you need to:
- Decide on your grading scheme
- Consider having students set grade weights
Accountability
There are three things we should do to encourage productive student behaviours in the TBL classroom.
- Students must be encouraged to individually prepare.
- Students must be encouraged to contribute to their team.
- Students must be made aware that they will be accountable for their contributions to their team.
In order to accomplish these goals, we must incorporate three important corresponding measures into the overall course design to ensure that we encourage the behaviours we want. These are:
-
- Individual performance
- Team performance
- Contribution to the team
An important measure of an individual’s performance comes from the individual Readiness Assurance Test scores. These scores give instructors a measure of individual accountability for the quality and completeness of each student’s preparation. This component must be a substantial enough portion of the final grade so that a student feels compelled to prepare, but not so large that the Individual Readiness Assurance Test (iRAT) turns into high-stakes testing. There are often other measures of individual performance that are not related to TBL, including individual assignments, midterms, and final examinations. Students are sometimes shocked at first at the low individual scores on the iRATs. Typical averages are 65-70%; that’s perfectly normal. Students may need to be reassured that the RATs are working as designed, that they constitute only a small portion of their final grade, and that the higher team grade on the tRATs (typically 85-95%) will balance out the lower iRAT score.
The team performance measures come from all team activities that are graded. These include the team Readiness Assurance Test scores and, in some courses, the Application Activities.
The measure of a member’s contribution to their team typically comes from a peer evaluation process. Peer evaluations hold students accountable for their level of participation. Peer evaluations also reassure students that loafers won’t benefit from the typically higher team grade; this is a happy side effect of the process.
Typical Grade Schemes
There is a wide range of grading schemes found in different Team-Based Learning courses. Course context, institutional culture, instructor goals, and course goals all need to be considered when you construct the grading scheme that is appropriate for your course. In some institutional environments, policy or local norms may not tolerate having a grade component like peer evaluation where students evaluate other students. For example, in some very competitive environments such as pre-med, it can be very difficult to sell a grading scheme that incorporates any summative peer evaluation process where one student assesses another student in a way that affects their final course grade. In these environments, the formative styles of peer evaluation are more commonly implemented, since they don’t affect students’ grades directly.
One of the big decisions here is whether to grade 4S tasks. There is no consensus on whether 4S tasks should be graded. Those that don’t grade are happy with the level of engagement and like that, they can ratchet up the difficulty of tasks without upsetting the students too much. Other people do grade the 4S tasks and are happy with the process. You need to make this decision for yourself and your context. A place to start is searching the TBL listserv archives about the merits of grading or not grading activities. There have been many good discussions about this on the listserv.
The TBL grade component in a prototypical TBL course with ungraded Application Activities (i.e. only iRAT and tRAT grades) can be as low as 25%. In these courses, the other 75% of grades might come from traditional components like individual essays, individual reports, midterms, and finals. There is considerable range on how TBL course grades are divided between individual and team work in different courses and contexts. In some courses, the grades are 100% based on TBL; these courses most often have graded Application Activities.
Grading Scheme in course with ungraded 4S tasks
TBL Components (25%-35%)
- Individual Readiness Assurance tests (10%-15%)
- Team Readiness assurance tests (10%-15%)
- Peer Evaluation (5%)
Traditional Components (65%-75%)
- Midterms
- Final Examinations
- Individual Assignments
Student Grade Weighting Activity
Many TBL practitioners use a grade weight setting exercise in a class early in the semester. Letting students have a say in grade weight setting can help with student “buy-in” to TBL.
Instruction to Students
Representatives of the teams will set the percentage of the course grade that will be determined by scores in each of the major performance areas (Individual Performance, Team Performance and Team Maintenance) during the first class period. Team representatives will also decide on the relative weight of the Readiness Assurance Tests vs. the final exam within the Individual Performance area. Grade weights will be set for the class using the following procedures:
1) Each team will set preliminary weights and select a member to meet with other teams’ representatives.
2) Team representatives will meet in the center of the room and develop a consensus (i.e., every representative has to be in agreement about the grade weights for the class as a whole.)
3) The only limitations on your grade weight decisions will be that:
- a minimum of 10% of the total grade must be assigned to each major performance area.
- within the individual performance area, at least 50% of the grade must be based on the final exam.
Frequently Asked Questions
What are common student concerns about grades?
In any kind of group work, students often have concerns that their grade depends on their less capable peers. That is one reason to keep the TBL portion of the course grade modest. In most of our TBL courses, the TBL portion is only 25% and the other 75% is traditional things like individual assignments, midterms, and finals. In that 25% portion, it is often 10% iRAT, 10% tRAT and 5% peer evaluation. If you have 5 modules with 5 Readiness Assurance Processes then individual iRATs are only worth 2% a time and tRATs are only worth 2% a time.
How do I handle students who don’t participate or “free ride”?
It is not a problem. This problem actually disappears when we get the task right. When an instructor comes to me with this problem, the first place we look for the source of the problem is the assignment itself. Team-Based Learning could easily be called decision-based learning…teams are naturally pretty good at decisions (think of courtroom juries). Large product-based assignments often spawn group dysfunction. If I am a C student and want a C at the end of the course and you are an A student…you are likely going to be unhappy with the quality I do….does the A student step in and redo the C student’s grade? This will likely make everyone in the group unhappy. Get the question right and everything seems to fall into place.
Is peer evaluation really necessary?
Absolutely – the peer evaluation process needs to have enough teeth that good students are rewarded for their work and students who don’t prepare as well or don’t contribute don’t benefit from the higher team grades.
Getting Ready for Learning
In this phase, you need to:
- Plan your first day of class
- Get yourself in an experimental and playful mood
Helpful Resource
- First Day Orientation Activity by Gary Smith
Getting Students Ready
Beginning the Course Well
How you start — specifically, the tone you set and how you orient your students — can determine student acceptance and satisfaction with TBL. Before getting to the classroom, you should spend some time getting your own rationales and understanding of TBL well organized. Make sure you can answer the deceptively simple student question, “Why are you using TBL?” When you truly understand your own reasons, you are in a much better position to communicate to your students how the TBL classroom works and how TBL will greatly benefit them and their learning. If you fail to properly orient your students or fail to convince them of the value of using TBL, then you are at risk of increased student resistance.
To get students started well, there are three goals you must achieve:
- Students must be convinced of the educational value of TBL.
- Students must be convinced that the structure of TBL addresses many of their legitimate concerns about group/teamwork.
- Students must be introduced to the specific TBL processes
Task 1: Sell TBL
Plan the first class carefully. Practice your approach. Speak with passion about the learning possibilities that TBL offers and how it relates to professional practice and the workplace.
You need to be very clear in your own understanding, convictions, and beliefs about why you are using TBL. Students can quickly see through teachers who are not absolutely convinced of the underlying rationales for using any teaching approach that stray from the usual passive lecture model. You need to spend time with the TBL literature to gain a sufficient understanding of how the various components of TBL work both on their own and together, and what each step of the TBL process is designed to achieve educationally. If you don’t have clarity in your own mind, the students will sense it. This can lead to unhappy students gaining motivational fuel to voice their arguments for maintaining the status quo and resisting change.
Task 2: Respond to Student Concerns
Some students will not be happy when you announce that your course will be using teams extensively. Missteps in the first days of class can be costly, giving unhappy or skeptical students cause to complain. Some pre-planning and introductory activities can help ensure that students will support, or at least tolerate, the switch to TBL. You should acknowledge that most of us, students and teachers, have had bad team experiences, and make sure to explain that Team-Based Learning, by design, reduces or eliminates many of those difficulties.
Task 3: Let Students Try TBL
On the first day, we also want to form teams and introduce students to the mechanics of TBL. Since this may be their first TBL experience, we need to show them that TBL is going to be truly different. We should not only describe how the process works but also the educational value of each stage. It is good to point out how the entire TBL process feeds the main course objective of helping students learn how to use course content to solve relevant problems. It is often helpful to make a case for problem-solving as an essential workplace skill, and that the TBL classroom is a chance to acquire that skill in a more supportive setting. Many teachers include a mock Readiness Assurance Process and Application Activity on the first day. The mock RAP is sometimes based on the course syllabus, a short handout about Team-Based Learning, or a short course-related article. Using a course-related article gets students to dive straight into the course material.
Try this mock 4S Team Task
You can introduce students to TBL with this mock Application Activity based on Gary Smith’s activity from the National Teaching and Learning Forum Newsletter article First-Day Questions for the Learner-Centered Classroom (NTLF newsletter, 2008).
The article asks the reader: “Thinking of what you want to get out of your college education and this course, which of the following is most important to you?”
- Acquiring information (facts, principles, concepts)
- Learning how to use information and knowledge in new situations
- Developing life-long learning skills
The teachers will give time for intra-team discussion leading to a team decision. Then the teacher will pass out the TBL voting cards and ask the teams to simultaneously report by holding up the card that corresponds to their team’s decision. Then you can facilitate a full class discussion contrasting the various team decisions. This activity both shows the students the mechanics of the Application Activity process and clearly surfaces differing student beliefs on what good classroom learning should look like. There is a wonderful way to extend this activity (Smith, 2013). At the end of the activity, students are asked to revisit the items on the list and consider which of the items would be better achieved in class and which items could be achieved through individual study. They will quickly zero in on “acquiring information” as something they could do on their own. You can then revisit the format of TBL and show them that is exactly how TBL is structured, you acquire some information on your own and then come to class where we can work on higher order goals like application and life long learning skills.
References
Smith, G. (2008). First-Day Questions for the Learner-Centered Classroom. National Teaching and Learning Forum Newsletter. Retrieved from http://www.ntlf.com/ Smith, G. (2013, November)
Selling Active Learning to Faculty Requires a Student Purchase, Too. Session presented at 38th Annual POD Meeting, Pittsburgh, PA.
Getting yourself Ready
Getting yourself ready is a VERY important part of being ready for TBL.
Your role changes from the authoritative dispenser of knowledge and truths to the designer of high-quality learning experiences. This can be disconcerting. When you switch to these kinds of learner-centred activities, it can be uncomfortable for you and your students at first. With the students more in control of their learning, you have less control over exactly how the learning progresses. The hard part for you at the beginning is to stay out of it – learning is messy – it is supposed to be. Getting yourself in an experimental, playful mood is essential. Some activities will soar and others may not. You need to role model for students taking risks, learning from failures and perseverance in the face of difficulties.
The other piece is to get ready for some student resistance – the question isn’t whether there will be student resistance, but rather when, how much, and how will you respond. Students may not want instructor-formed teams, they may insist they learn better from lectures, or not be interested in talking to their less capable peers. You need to be ready to listen, respond, and STAY the course.
WHAT IS TEAM-BASED LEARNING?
Team-Based Learning (TBL) enables you to realize the full potential of the flipped classroom by providing coherent organizational structures to design your course. TBL is a unique and powerful form of small-group learning that was developed at the University of Oklahoma Business School in the late 1970s. TBL helps in addressing two of the main questions you need to ask when thinking about flipping your course. First, “How can I ensure my students prepare?” Second, “When students are prepared, what am I going to do with the ‘free’ class time?” The goals at the heart of these questions are achieved by using TBL’s Readiness Assurance Process and team application activities.
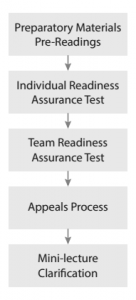
Readiness Assurance Process
Prior to class, students use assigned preparatory materials (textbook chapters, articles, videos, etc.) to learn basic content. In class, the Readiness Assurance Process (based on these preparatory materials) uses a clever sequence of individual and team tests to unleash the power of social learning. The individual test is completed first and it holds the students accountable for preparing prior to class. The same test is then completed in teams, providing immediate feedback on understanding and rich collaborative learning opportunities. The Readiness Assurance Process process converts student pre-class preparation into true readiness to begin problem-solving. The next step is team application activities.
Team Application Activities
The majority of class time is spent on team application activities where student teams learn how to apply the course concepts to solve relevant and interesting problems. These application activities use something known as the 4 S framework to structure and guide problem-solving and decision-making events. The 4 S structure lets you consistently build problem-solving events that naturally lead to spirited discussions about the application of the course content.
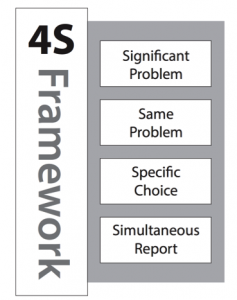
When you ask the right kind of question – one that requires both consideration of complex data and careful discrimination between reasonable options – powerful things can happen. The consideration of viable options that require deep, complex analysis is the holy grail of TBL.
Here is an example question from an engineering course:
You are designing a bridge for the local saltwater marina. What bridge-building material would you recommend, and why?
- Wood
- Concrete
- Steel
- Aluminum
These possible answers seem deceptively simple, but the process to arrive at a choice, and the justification required to support the choice, can be rich and complex.

When teams simultaneously report their application activity decisions, any contrasts in thinking are immediately apparent. These contrasts then allow the instructor to facilitate intense give-and-take discussions. Teams get immediate focused feedback from other teams on the quality of their thinking. Following simultaneous reporting, teams challenge other teams’ decisions and may be required to defend their choices by explaining their rationales. During these application activities, you get to see the true power of TBL and the flipped classroom when teams are making decisions, publically committing to them, and then deeply discussing their decisions.
TBL is a powerful pedagogical and instructional framework that gives you some proven and reliable structures around which to build your course. Because TBL classroom activities are built on students giving students feedback, TBL scales very well to large classroom settings (200-400).
Team-Based Learning at UBC
TBL has been successfully used at UBC for over 14 years and in classes as large as 200 students. The original classroom pioneers in Applied Science were Pete Ostafichuk from Mechanical Engineering and Thomas Froese from Civil Engineering. Pete started with a 2nd year Mechanical Design course and Thomas started with a 4th year Construction Management course.
Pete has reflected on his journey to TBL in the preface of his new Team-Based Learning book, “The thing that sold me on TBL most and compelled me to give such a quick “yes” to adopting it was that TBL just made sense. Even as a new faculty member, I recognized there had to be a better way to teach than by passive lectures. As a student, I remember sitting in class thinking “This makes sense” as the teacher lectured away, only to pull my hair out at home as I tried to apply some of the concepts on my own. Flipping this so the students cover the basic stuff on their own before class and then they have the support of a team—as well as the insight and guidance of the subject “expert”—as they actually apply the course material to challenging problems seems so obvious and natural that I wondered why I hadn’t been exposed to this approach before.”[i]
Jim Sibley, the former Director of Applied Science’s Center for Instructional Support, has supported faculty in the adoption of TBL right from the start. TBL has now been used at UBC in a wide variety of disciplines including Engineering, Psychology, Social Work, Nursing, Planning, and Business. The Centre and Jim have now become international leaders in TBL by helping institutions all over the world develop TBL-based programs.
To learn more about TBL, visit LearnTBL.ca
USING TEAMS PROPERLY
TBL Teams Need to be Large
Teams should be five to seven students. TBL teams need to be big enough to solve the wonderful, complex, messy, real-world problems that are at the heart of every TBL course experience. The larger team size gives the teams the intellectual horsepower to solve these problems. TBL teams need to be larger than is suggested in most cooperative or collaborative learning literature because of the complexity of the problems.
The recommended five-to-seven student size may be contrary to your intuition and experience. But again and again, new TBL teachers who try smaller team sizes are disappointed with the results. TBL has structures and processes that effectively manage student teaming behaviours and control “social loafing”. Every individual has accountability to the teacher for their preparation (iRAT), and every individual has accountability to their teammates for the quality of their contribution to their team’s success (tRAT and peer evaluation). Peer evaluation lets us give the grading scheme the teeth to motivate every student to contribute and be fairly rewarded (or penalized) for their level of contribution to their team.
TBL Teams Should be Teacher-Created
Use teacher-created, criterion-based team formation, which ensures the best educational results. Teacher-formed teams have been shown to outperform randomly- and student-selected teams (Brickell et al, 1994). To get these balanced and diverse teams, we always form the teams for the students. Student-selected teams are a very bad idea. The educational literature is very clear about the importance of not letting students create their own teams (Brickell, Porter, Reynolds, & Cosgrove, 1994). Student-selected teams consistently underperform other team formation strategies. We paraphrased from Brickell et al (1994) in the opening chapter, but it is worth repeating here, student-selected teams are often “social entities” where existing relationships and cliques can make team cohesion difficult.
TBL Teams Need to be Diverse
We want to have heterogeneity in every team to ensure that a wide range of skills, opinions, and personal experiences can come into play during team deliberations. This is great news, since efforts to increase enrollment of under-represented groups and to recruit larger numbers of international students are increasing diversity in our classrooms year upon year. TBL actually gets better with more diverse teams, if we craft our activities to leverage that diversity. Student-selected teams are often very homogenous and this can easily lead to “group think” behaviours since teammates on a student-selected team are often very similar in cultural, educational, and life experiences. These student-selected teams may not have the diverse range of talent and experiences they need to be successful in the TBL classroom.
TBL Teams Need to be Balanced
The whole range of student strengths and weaknesses must be fairly distributed across all teams. Does every team need to have a member with prior work experience, someone who has lived overseas, or someone with a previous degree? Whatever important student assets and liabilities you can identify should be fairly distributed to create balanced teams.
TBL Teams Need to be Permanent
TBL teachers often talk of initially underestimating teams’ abilities to solve difficult problems and needing to ratchet up the problem difficulty as the semester progresses. This is because the teams naturally, with time and practice, get better at problem-solving together. To let the teams “gel”, the members must work together consistently. To allow this to happen, teams must be permanent for the duration of the course. This “gelling” process, known as team cohesion in the literature, can be seen in the classroom. With time, groups of students become high-performance learning teams.
No Need to Manage Teams
A remarkable aspect of TBL is that teams often don’t need to be managed at all. Unlike other forms of group learning, lecturing on group dynamics and assigning specific roles to team members is simply unnecessary. The combination of thoughtfully created teams and the focus on decision-making activities eliminates the need for any kind of team management. This is because shared activities and goals, the sequence of TBL activities, and accountability to one’s team all synergistically aid in the development of team cohesion. There was a remarkable study that highlights the amazingly rapid development of team cohesion in TBL (Michaelsen, Watson, & Black, 1989). The study found that in early Readiness Assurance testing, student teams often used simple votes on split decisions and let the majority rule. But as team members found their social feet within the team and team cohesion began to increase with each testing cycle, the decision-making process progressively switched to a more consensus-based decision-making process. It showed that in as few as four Readiness Assurance cycles, teams had switched strategy from majority rules to consensus-based decision-making.
There is a subtle, but extraordinary feedback and accountability process as part of the whole class report and discussion. If your team didn’t listen to an important minority opinion or a majority of team members were bullied into a choice, these poor choices often come to light during the whole class reporting discussion. The team members will understand that they committed an error in listening. This self-correcting feedback can automatically improve the team dynamics in subsequent activities.
References
Brickell, J. L., Porter, D. B., Reynolds, M. F., & Cosgrove, R. D., (1994). Assigning Students to Groups for Engineering Design Projects: A Comparison of Five Methods. Journal of Engineering Education, 7, 259-262.
Michaelsen, L. K., Watson, W. E., & Black, R. H. (1989). A Realistic Test of Individual Versus Group Consensus Decision Making. Journal of Applied Psychology, 74(5), 834-839.
Excerpted from a 10-page chapter on Using Teams Effectively in Getting Started with Team-Based Learning by Jim Sibley and Pete Ostafichuk published by Stylus, Sterling, VA
ENSURING STUDENT READINESS
Having the students come to class prepared is critical to have any possibility of deeper classroom conversations and meaningful problem-solving activities. Students not only need to be accountable for their initial preparation but need to be ready for the activities.
Overview of the Readiness Assurance Process
The Readiness Assurance Process (RAP) is a five-stage process that is used at the beginning of each module in your course. The purpose of the RAP is to ensure that students understand the fundamental concepts, definitions, and foundational knowledge they need to begin problem-solving. The Readiness Assurance Process centers on administering two short multiple-choice tests. The first test is taken individually, and then the same test is taken again by the students in their teams. It sounds simple, but it has powerful results.
Integrating RAP
The RAP prepares students for the activities that follow. It is not about testing. Students will become very upset if the RAP is presented as just another assessment strategy, rather than preparation for the activities that follow. If the RAP process is not carefully integrated with the activities that follow, you can expect the unhappy student to cry “Testing before teaching makes no sense!” It’s the synergy between the crystal-clear objectives of the instructional sequence, the Readiness Assurance Process, and the Application Activities that follow that give TBL much of its instructional power.
Let’s start by examining each of the five stages of the Readiness Assurance Process.
Stage 1: Student Pre-class Preparation
Stage 2: Individual Readiness Assurance Test (iRAT)
Stage 3: Team Readiness Assurance Test (tRAT)
Stage 4: Appeals Process
Stage 5: Mini-Lecture/Clarification
Pre-Class Preparation: Readings or Other Preparatory Materials
Before the beginning of each module, students are assigned readings or other preparatory materials such as newspaper articles, journal articles, textbook chapters, podcasts, PowerPoint slides, or instructional videos. They must study these materials to prepare for the module activities. We typically assign 30-60 pages in preparation for a two-week module. The specific amount of preparatory materials will depend on the difficulty of the material, the discipline, and the institutional culture.
In general, we have found that shorter and more focused readings are better. TBL teachers find that the quality of the reading materials is even more important than in a traditional course since the students will actually be required to read the course materials.
Individual Readiness Assurance Test
After completing the preparatory materials, students come to the first class session of a TBL instructional sequence or module. They then individually complete a short 10-20 question multiple-choice test based on the readings. The RAP test is typically closed-book, but some teachers do allow short summaries on index cards. However, teachers should be mindful that high-quality RAT questions are not based on rote memorization or recall.
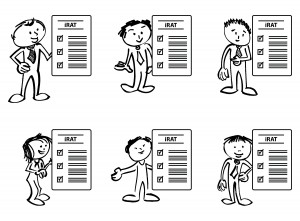
At a very simple level, the Individual Readiness Assurance Test is about individual accountability for pre-class preparation. Did students complete the preparatory materials? The test should only focus on giving students the vocabulary and important foundational concepts they need to successfully begin problem-solving. Using the analogy of a book, the test should be constructed closer to the table-of-contents level than the index level. It is recommended that you stay away from picky details, and focus only on important major concepts. However, iRAT questions should still be fairly challenging. Overall, the average student score is typically 65-75% on the iRAT and 85-95% on the tRAT.
Team Readiness Assurance Test (tRAT)
The team RAP test, or tRAT, begins immediately after the iRAT (except as discussed above with the online iRAT, in which case the tRAT begins as soon as possible after the iRAT). In smaller classes, following the iRAT, the students move to their teams. In large classes, it is preferable to have students sit in their teams during the whole Readiness Assurance Process to reduce disruption at the beginning of the team test. At the end of the iRAT, students keep their question sheets but must turn in their individual scanner cards or scoring sheets before beginning the tRAT. The same questions are used for both tests.
Team tests are high-energy, noisy, and often chaotic events as students discuss and negotiate their answers and deepen their understanding. Typically, we budget 25 minutes for a 20-question team test, although we let students know that when half of the teams are done, the remaining teams have five minutes left to finish.
A special kind of scoring sheet, known as an IF-AT form (Immediate Feedback Assessment Technique), is typically used for team tests. IF-ATs are ”scratch-and-win”-style scoring sheets. They dramatically increase the quality of discussion in the tRAT process and, more importantly, provide rich, immediate corrective feedback. Students absolutely love using these test cards. You can expect high-fives and cheering as students complete the tRAT. We have even had some students thank us for the test! If you have not tried these, you must!
Appeals Process
The appeals process is a structured method that provokes teams to look up answers they got wrong on the tRAT. Near the end of the tRAT process, the teacher circulates around the room and encourages teams that may have gotten an answer wrong on the tRAT to consider appealing the question. The teams use an appeals form that is included in their folder. The form describes in detail how to make a successful written appeal. Appeals are only accepted from teams, not individuals. To appeal a question successfully, the team needs to build a written rationale that makes a case, supported with evidence, for why a particular question’s answer might be wrong. They can declare ambiguity in either the question or in the readings. To support their case, they must make specific citations to the source of the ambiguity, or reword the question to eliminate the ambiguity.
Mini-Lecture/Clarification
Following the appeals process, the teacher can, if necessary, provide a short, targeted mini-lecture or clarification on the RAP concepts that the students are still having difficulty with. This lets teachers focus just on what the students don’t know, rather than on what they already know. Students are often anxious to begin the Application Activities. Going over every question or talking for too long can burn up student goodwill. A common mistake made by new TBL teachers is to sequentially review every question. Don’t do it. This can quickly drain energy from the class.
The total RAP process takes 50-70 minutes for a 20-question test. In shorter classes, teachers will often shorten the RAP test. For our 50-minute classes, we often give 12-15 questions; this gives us time to complete the entire five-stage process.
Why the RAP is So Powerful
Pre-Class Preparation Outcomes
The pre-class preparatory materials you select can significantly help focus student attention on the most salient course concepts. Using a reading guide can be of even further benefit. It is important to remember this is not students’ only opportunity to learn course content. During the problem-solving Application Activities, they will continue learning. The students are motivated by their own interests and the knowledge that their understanding will be on public display during the Application Activity reporting. This is a powerful motivator for students to take learning seriously.
Individual Readiness Assurance Outcomes
The iRAT can accomplish a few different things. Its main purpose is to have individual accountability for each student’s pre-class preparation. Simply put, if you don’t prepare, you probably won’t do well on the iRAT. The focus of the Readiness Assurance Process also cues students to the most important course concepts. If confidence testing is used, there is also an interesting metacognitive component, where students might admit to themselves that they really don’t know something. This can be a powerful motivator to have them reconsider their preparation strategy for next time.
Team Readiness Assurance Outcomes
During the tRAT stage, some very interesting educational outcomes begin to emerge. First, through social dialogue and peer teaching, students generate a deeper shared understanding as they try to come to a consensus on the answer to a particular question. Next, if you are using IF-AT cards, the teams receive immediate corrective feedback on each question. Students leave the test knowing the answer to every question; you can’t get more immediate than that!

The IF-AT cards also help establish more positive group norms. The pushy student with the wrong answer may be a few scratches away from having the team stop listening. Similarly, a quiet student can be drawn into the conversation if the team recognizes that they often have the right answers and that listening to the quiet student will help the team. Finally, the chronically underprepared student is usually found out by their teammates, and peer pressure and peer evaluation can sometimes motivate these underprepared students to work harder.
Appeals Process Outcomes
The magic of the appeals process is that it pushes students back into the reading or other preparatory material, right where they are having the most difficulty. These difficulties are clearly identified by questions they got wrong on the tRAT. Teams must look up the concepts they still don’t understand. They may research the answer only to find that the teacher is correct, or they may unearth a genuine ambiguity. They need to build the appeal by reviewing both the preparatory material and the question, and by building a case supported with evidence.
Mini-Lecture/Clarification Outcomes
At the end of the first four stages, both student and teacher have a clearer understanding of which course concepts continue to be difficult. The students have had extensive feedback during the tRAT process and an opportunity with the appeals process to clear up any misconceptions. But some troublesome concepts can remain. These can be clarified during the short mini-lecture that closes out the Readiness Assurance Process. The power is that the clarification focuses on what the students know they don’t know. It doesn’t waste class time on things they already understand.
A word of caution: Teachers new to TBL often fall in love with the structures and outcomes of the Readiness Assurance Process, and may think about just implementing the RAP and not the rest of the pieces of TBL. This is a serious mistake since the main goal of TBL is to help students use course concepts to solve significant problems, which occurs during the Application Activities. The RAP is about getting your students ready. If you only use the RAP in your course, students can legitimately complain about testing before teaching. If you only use the RAP process, what are you getting students ready for?
EXCERPTED FROM A 39-PAGE CHAPTER ON THE READINESS ASSURANCE PROCESS IN GETTING STARTED WITH TEAM-BASED LEARNING BY JIM SIBLEY AND PETE OSTAFICHUK PUBLISHED BY STYLUS, STERLING, VA
TEAMS SOLVING PROBLEMS
Application Activities and the 4 S’s
So what makes a good TBL Application Activity? For creating an effective Application Activity, the guiding principles in TBL are the 4 S’s.
Significant Problem
Significant problem reminds us that the problem must be meaningful to the course and rich enough to engage the whole team. A trivial problem that can be solved by a single person working alone does not make a good team Application Activity. Rather, we should be seeking a complex problem with incomplete or contradictory information where a diversity of perspectives is an asset.
Same Problem
Same problem refers to having the entire class work on the same problem at the same time. The rationale is that by having all teams work on the same problem, they will have greater engagement and investment when it comes time for a class-wide discussion or debriefing. Having a deep knowledge of the problem will allow for a more informed critique of other teams’ work, not to mention a more engaged and passionate critique if other teams arrive at a conflicting conclusion for the same problem. This approach is in contrast to the common practice outside TBL of having each team work on a different problem so they can share what they each have learned; without having everyone work on the same problem, each team becomes the “expert” of their own topic, which does not invite challenges or contradictory conclusions in the same way.
Specific Choice
Specific choice requires that teams be able to express their solution to a problem by means of an easy-to-describe choice. Before giving some examples of what a specific choice might look like, it might be helpful to consider some examples that are not specific choices: a multi-page report, an oral presentation, a demonstration of a functioning device or process, or an ordered list, to name a few. Creating these deliverables may be valuable experiences for students and may even relate to some of the course outcomes, but they do not lend themselves well to TBL Application Activities. Instead, the specific choice of a good Application Activity requires that the team members all come to agreement on a single, clearly defined answer in light of potentially vague or conflicting information. Having teams make a specific choice also makes it possible to quickly see and compare responses between different teams (part of the next “S”). Posing multiple-choice questions is one of the most common ways to require a specific choice, provided the question is not trivial — that is, the problem is significant, as described above.
Simultaneous Reporting
Simultaneous reporting is the final “S”, and it requires that responses from all teams are reported to the class at the same time. Requiring the response in the form of a specific choice (the previous “S”) makes simultaneous reporting possible because a specific choice is easy to report. Simultaneous reporting encourages team accountability since each team knows their response will be available for all to see, and no team wants to stand out with an unreasonable, hastily chosen answer because they did not put the same thought into the problem as the other teams. Put another way, the public commitment that comes with simultaneous reporting motivates the teams to seriously engage in the activity. There is also a fairness that comes with simultaneous reporting since no one generally wants to be “picked on” first. More importantly, there is no opportunity for later teams to unfairly modify their answer based on the responses of earlier teams since everyone commits to their answer at the same time. Finally, simultaneous reporting creates anticipation, excitement, and engagement in the classroom; teams want to see how their response compares to those of their classmates. Techniques for achieving simultaneous reporting follow naturally from the type of specific choice the teams make, and later in this chapter, we will explore a variety of different simultaneous reporting possibilities.
The revealing of the choices to the class should be simultaneous, not the recording of the choices by the teams. For example, teams could report their answer to the teacher or teaching assistant by a certain cut-off time in the class, the teacher can record these answers as they come in (perhaps on a laptop or overhead transparency), and then the teacher can reveal all answers at once using a digital or overhead projector. A common facilitation approach in these circumstances is the “last to report, first to talk” rule.
There is a subtle, but extraordinary feedback and accountability process as part of the whole class report and discussion. If your team didn’t listen to an important moronity opinion or a majority of team members were bullied into a choice, these poor choices often come to light during the whole class reporting discussion. The team members will understand that they committed an error in listening. This self-correcting feedback can automatically improve the team dynamics in subsequent activities.
Example: Active and Passive Voice With Voting Cards
Consider the following exercise (adapted from Michaelsen, Fink, & Knight, 2004) to be presented to teams in an English class:
Imagine you are an English teacher and you are working with your students to develop their understanding of the active and passive voice. You are trying to develop their next assignment. Which wording in the following assignments would best promote higher-level thinking and a rich reporting discussion?
A. List the mistakes writers frequently make that detract from their efforts to write in the active voice.
B. Read the following passage and identify a sentence that is a clear example of (a) active and (b) passive voice.
C. Read the following passage and identify the sentence in which the passive voice is used most appropriately.
In advance, teams are given three large coloured cards prominently labelled A, B, and C. After an appropriate time for teams to discuss and determine their choice, the instruction is given for teams to simultaneously hold up their cards (for example, “on the count of three, hold up your choice”). A teacher-facilitated discussion of the class responses follows.
To highlight the 4 S’s in this example:
- The problem not only requires an understanding of what differentiates active and passive voice, but also an ability to critically evaluate the effectiveness of potential learning experiences in enhancing student understanding (significant problem).
- All teams work on the same scenario at the same time (same problem).
- Each team chooses one of three possible answers (specific choice).
- All teams reveal their choice at the same time by holding up a coloured voting card on cue (simultaneous reporting).
Example: Location for Dry-Cleaning Business Selected Using a Pushpin
In this second example (adapted from Sweet and Michaelsen, 2012), imagine an economics course in which teams are tasked with identifying the best location for a business:
You are consulting for a new business owner who wants to open a dry-cleaning store in Norman, Oklahoma. Where would you recommend locating a new dry-cleaning business (and why)?
A street map of Norman, Oklahoma is placed at the front of the room and each team is given a pushpin. At the appointed time, after teams have had time to analyze the scenario and reach a supported conclusion, each team sends a representative to the front to indicate their chosen location on the map using their pushpin. The scatter of pins on the map creates a natural motivation to understand other teams’ thinking in determining their choices. A teacher-facilitated discussion of the class responses follows.

This example also makes effective use of the 4 S’s.
- Drawing from their course material, teams must analyze the business and location characteristics, identify and appraise possible locations, and recommend and justify a location based on an evaluation of the potential options they have identified (significant problem).
- Again, all teams are tasked with the same case to analyze (same problem).
- Each team has a single pushpin to indicate the location of their business on the map (specific choice).
- All teams place their pushpins at nearly the same time (simultaneous reporting).
As teams also need to be prepared to support and defend their choice during the class discussion, there is little concern about a team changing their decision at the last second if they happen to see a difference between their choice and other teams that have already placed their pins.
References
Michaelsen, L., Bauman-Knight, A., Fink, D. (2004). Team-Based Learning: A Transformative Use of Small Groups in College Teaching. Sterling, VA: Stylus.
Sweet, M., & Michaelsen, L. K. (2012). Team-Based Learning: Small Group Learning’s Next Big Step. San Francisco, CA: Jossey-Bass.
SIMULTANEOUS REPORTING TECHNIQUES
Voting Cards
The standard TBL approach for simultaneous reporting is for each team to hold up a coloured letter card that indicates its decision. (Note the ring or clip on the cards in the figure used to hold everything together). Each team’s response is highly visible and clearly linked to them. It is also very easy for teams to compare their response to those from other teams.

This kind of reporting can be used as the starting point for a facilitated conversation where student teams defend their positions and challenge the positions of other teams. This technique can be effectively used for both short problems (four or five per hour) and long problems (one per hour or longer), provided the rest of the 4 S’s are met.
Writing good distractors (the “incorrect” or less correct answers) is essential to this technique. The class discussion is largely driven by teams wishing to understand, challenge, and reconcile differences in the thinking processes that led to the different decisions.
Reporting choices by holding up cards is effective in everything from small classrooms to very large classrooms with 50 teams or more. The greatest challenge in larger classes is to effectively facilitate a whole-class discussion that keeps all students engaged. Some difficulty may also occur in large classes when voting cards only go up for a few seconds, but the reporting conversation takes much longer since once the cards go down, it is no longer clear which teams had which responses. One solution to this problem is to use flag holders, similar to place card holder stands used on tables at banquets and weddings, that allow teams to indicate when they have completed their work and are ready to report. Voting cards can later be attached to the same stand so they are visible for the duration of the discussion.
Pushpins or Sticky Notes
When students are working with certain kinds of graphical data (maps, charts, drawings, building plans, concept maps, and so on) you can achieve an effective simultaneous report by having teams select a specific location as their answer to the question. Teams can either use pushpins or sticky notes to indicate their location choice. The Oklahoma dry-cleaner exercise earlier in the chapter was an example of pushpins on a map. Once each team has decided on a location and made that decision public, you can then facilitate a discussion between teams as they defend their position choice and challenge the decisions of other teams.
An example of this technique from a civil engineering course featuring the use of pushpins is:
An overweight truck has driven onto a bridge. The truck’s weight far exceeds the bridge’s designed carrying capacity. At which location would the bridge structure likely fail first? Identify the specific point on the drawing, and be prepared to defend your position. Show the specific location with a push pin on the drawing.
A second example below with a “virtual sticky note” requires students to report their choice to the teacher. who then labels each team’s selection on a digital image, hidden from the class until the teacher is ready to reveal it:
Carefully disassemble the Lexmark Z615 printer provided and examine the components. Identify the component with the most significant violation of a Design for Assembly guideline (i.e. the component that, if redesigned, would benefit the assembly process most). Report your component to the teacher before 10:30 am. A class discussion will follow — be prepared to justify your choice.
Whiteboards
The whiteboard approach is a variation of the voting cards but is more open-ended. Each team writes their decision on a small whiteboard, similar to the one shown in Figure 4.6. The size of the whiteboard limits the possible complexity of the report, so students can easily compare their team’s decision to that of other teams. Unlike voting cards, teams are not alerted to a possible subset of correct answers.
A whiteboard can be used for student reporting in examples such as the following:
Given the following investment portfolio, investor profile, and market conditions, which stock would you sell first and when?
A patient presents at the ER with the following symptoms. What would be your first course of action? What test would you order first?
In each case, after working on the problem, teams write their decision on their whiteboard. In a similar manner as with the voting cards above, the teacher coordinates the simultaneous revealing; for example, “Hold your whiteboards up on the count of three.” Classroom size and layout will have a bearing on the use of this technique, as ideally, all teams should be able to see all of the other teams’ answers. Keep in mind that unlike a coloured voting card, which can be viewed from front and back, whiteboards can only be viewed from one side.

Gallery Walk
Gallery walks are useful for problems where the solutions cannot be conveyed by a simple A, B, or C choice (well suited to voting cards) or a short phrase (well suited to whiteboards). This can also be used to distill a long, complex solution into its most pertinent elements as teams prepare a concise solution to a complicated problem.
You generally need to make sure that the team responses have some structure to ensure comparability between team outputs. In some activities, this might require that teams first state on their poster their choice or decision, and then use the rest of the poster to list further details such as three strengths, three weaknesses, and two concerns with their choice.

Whatever the method teams adopt, the posters are evenly spaced around classroom walls using masking tape. With the posters on the wall, the actual gallery walk involves having teams review and critique the work of others. In smaller classes, teams can wander around and view the other posters, but in larger classes, it helps to coordinate the movement from poster to poster.
EXCERPTED FROM A 29-PAGE CHAPTER ON APPLICATION ACTIVITIES IN GETTING STARTED WITH TEAM-BASED LEARNING BY JIM SIBLEY AND PETE OSTAFICHUK PUBLISHED BY STYLUS, STERLING, VA
MAKING STUDENTS ACCOUNTABLE
There are three things we should do to encourage productive student behaviours in the TBL classroom:
- Students must be encouraged to prepare individually.
- Students must be encouraged to contribute to their team.
- Students must be made aware that they will be accountable for their contributions to their team.
To accomplish these goals, we must incorporate three important corresponding measures into the overall course design to ensure that we encourage the behaviours we want. These are:
- Individual performance
- Team performance
- Contribution to the team
Utilizing Scoring to Encourage Desired Behaviours
An important measure of an individual’s performance comes from the individual Readiness Assurance Test scores. These scores give instructors a measure of individual accountability for the quality and completeness of each student’s preparation. This component must be a substantial enough portion of the final grade so that a student feels compelled to prepare, but not so large that the Individual Readiness Assurance Test (iRAT) turns into high-stakes testing. There are often other measures of individual performance that are not related to TBL, including individual assignments, midterms, and final examinations. Students are sometimes shocked at first at the low individual scores on the iRATs. Typical averages are 65-70%; that’s perfectly normal. Students may need to be reassured that the RATs are working as designed, that they constitute only a small portion of their final grade, and that the higher team grade on the tRATs (typically 85-95%) will balance out the lower iRAT score.
The team performance measures come from all team activities that are graded. These include the team Readiness Assurance Test scores and, in some courses, the Application Activities.
The measure of a member’s contribution to their team typically comes from a peer evaluation process. Peer evaluations hold students accountable for their level of participation. Peer evaluations also reassure students that loafers won’t benefit from the typically higher team grade; this is a happy side effect of the process.
There is a subtle, but extraordinary feedback and accountability process as part of the whole class report and discussion. If your team didn’t listen to an important minority opinion or a majority of team members were bullied into a choice, these poor choices often come to light during the whole class reporting discussion. The team members will understand that they committed an error in listening. This self-correcting feedback can automatically improve the team dynamics in subsequent activities.
Typical Grading Schemes
There is a wide range of grading schemes found in different Team-Based Learning courses. Course context, institutional culture, instructor goals, and course goals all need to be considered when you construct the grading scheme that is appropriate for your course. In some institutional environments, policy or local norms may not tolerate having a grade component like peer evaluation where students evaluate other students. For example, in some very competitive environments such as pre-med, it can be very difficult to sell a grading scheme that incorporates any summative peer evaluation process where one student assesses another student in a way that affects their final course grade. In these environments, the formative styles of peer evaluation are more commonly implemented, since they don’t affect students’ grades directly.
The TBL grade component in a prototypical TBL course with ungraded Application Activities (i.e. only iRAT and tRAT grades) can be as low as 25%. In these courses, the other 75% of grades might come from traditional components like individual essays, individual reports, midterms, and finals. There is considerable range on how TBL course grades are divided between individual and team work in different courses and contexts. In some courses, the grades are 100% based on TBL; these courses most often have graded Application Activities.
EXCERPTED FROM A 17-PAGE CHAPTER ON THE IMPORTANCE OF ACCOUNTABILITY IN GETTING STARTED WITH TEAM-BASED LEARNING BY JIM SIBLEY AND PETE OSTAFICHUK PUBLISHED BY STYLUS, STERLING, VA
IF-AT CARDS
A special kind of scoring sheet, known as an IF-AT form (Immediate Feedback Assessment Technique), is typically used for the team Readiness Assurance tests. IF-ATs are ”scratch-and-win”-style scoring sheets. They dramatically increase the quality of discussion in the tRAT process and, more importantly, provide rich, immediate corrective feedback. Students absolutely love using these test cards. You can expect high-fives and cheering as students complete the tRAT. We have even had some students thank us for the test! If you have not tried these, you must!

How They Work
These “scratch-and-win”-style answer sheets were invented by Mike Epstein at Ryder University. On an IF-AT form, each question has a row of boxes that can be scratched like a lottery ticket. A small star, exposed by scratching one of the boxes, indicates the correct answer. Students must scratch off the opaque coating one box at a time in hopes of finding the right answer. The power of these cards is in the conversation that students are forced into as they try to generate shared understanding and consensus before choosing which box to scratch. The other powerful feature of these cards is the immediate, corrective feedback.
Decremental scoring is used to induce teams to continue to discuss the questions after an incorrect scratch. One possible point-allocation system for an IF-AT card could be four points for the right answer on the first scratch, two points for the right answer on the second scratch, one point for the right answer on the third scratch, and zero if they needed to scratch off all four boxes to reveal the correct answer. This encourages teams to engage with a question and continue the conversation until they know the correct answer.
Where to Get IF-AT Cards
Teachers new to TBL often ask how to print IF-ATs to match their tests. In fact, each set of numbered cards already has the stars in a particular pattern and it is the teacher who arranges the answer choices of the test to match the selected card. Cards are available in many different answer patterns to give the teacher flexibility in arranging answer choices and to prevent the students from memorizing or predicting the answers. Each card has an identifying key number on a perforated tab at the bottom that can be removed by the teacher. The IF-AT cards are available in lengths of 10, 25, and 50 questions and with either four options (A-D) or five options (A-E). IF-AT forms are available at cognalearn.com/IFAT